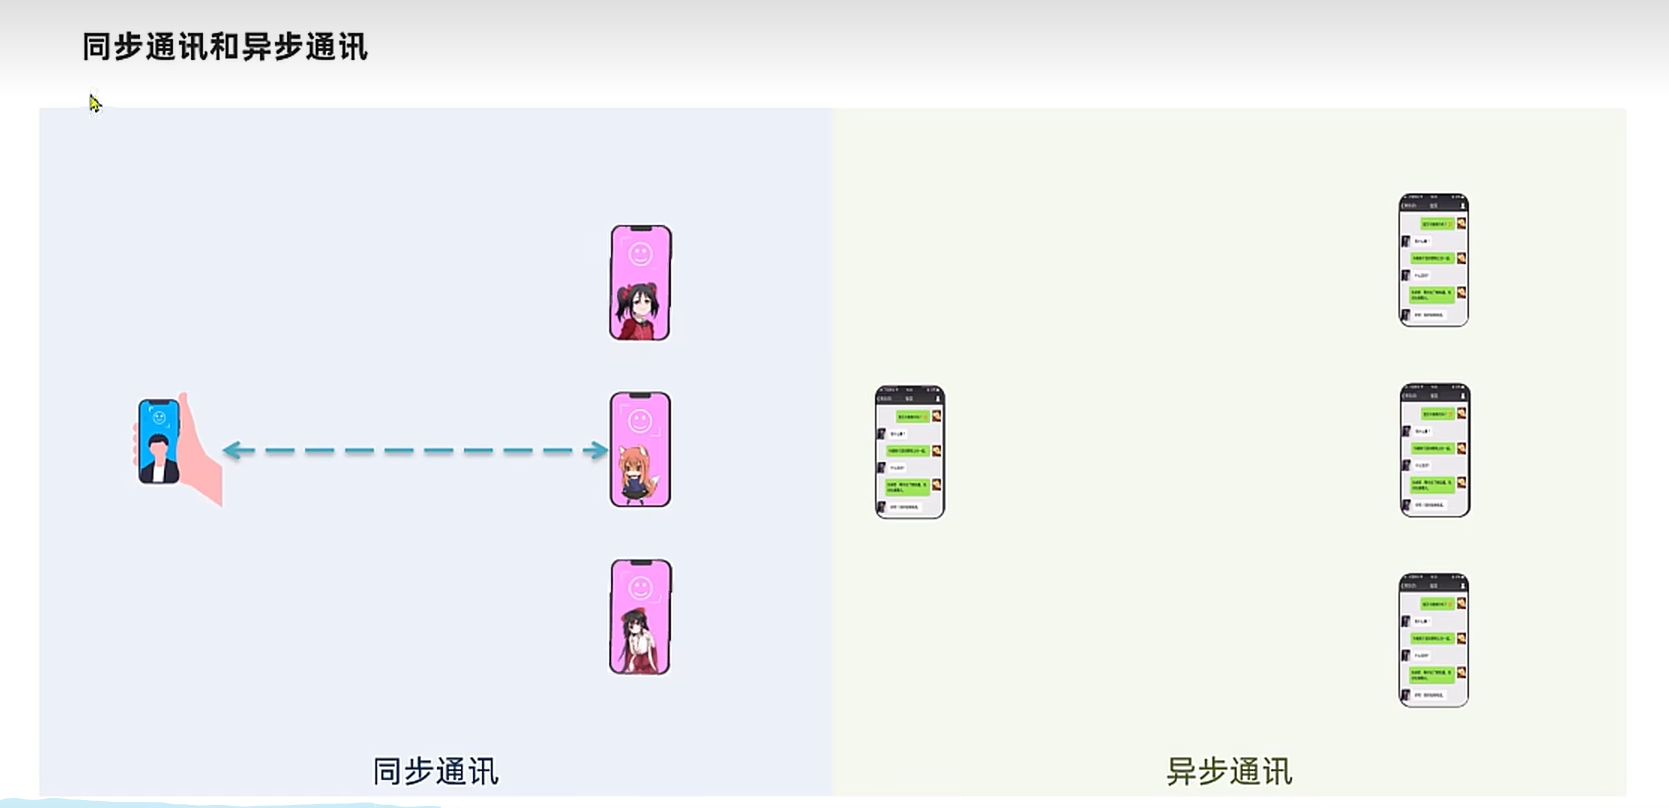
消息队列-MQ 同步通讯和异步通讯
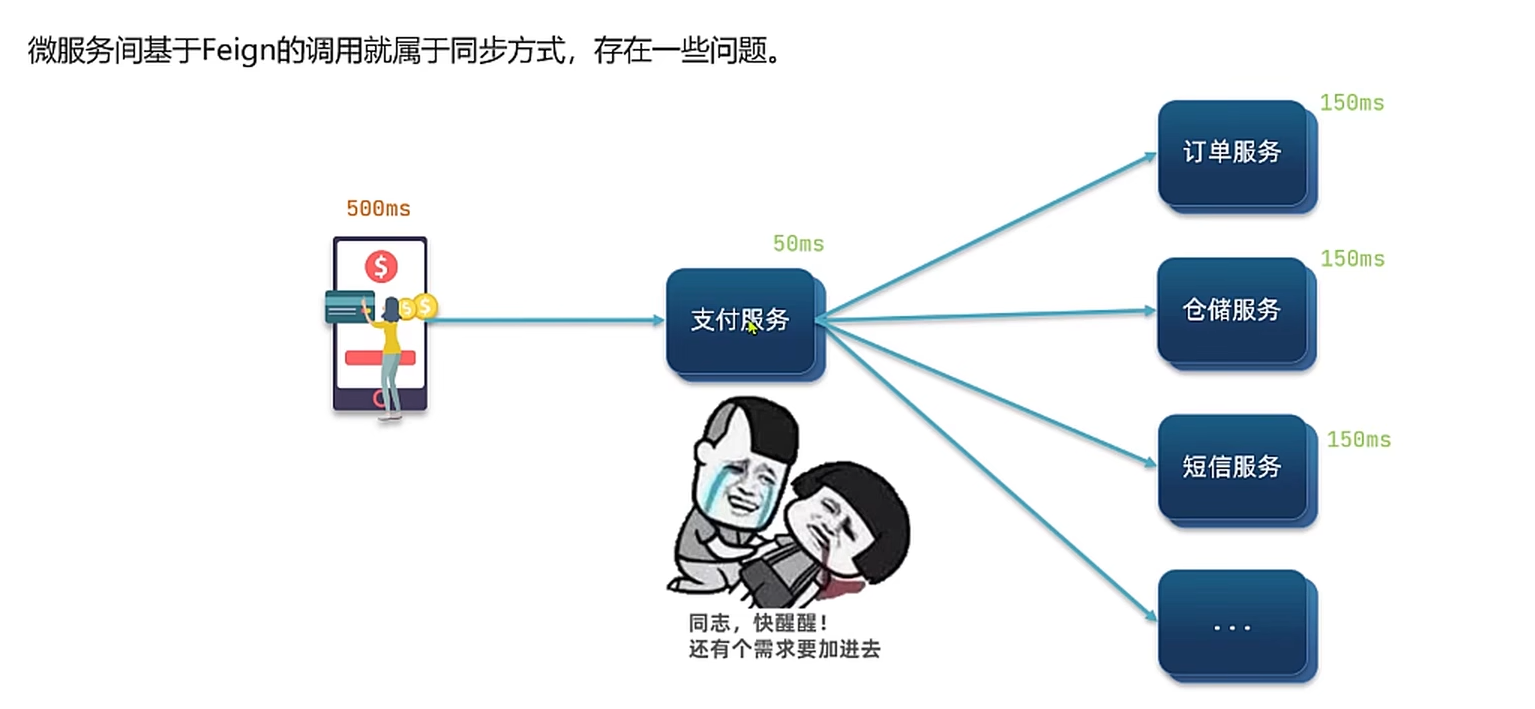
同步调用的问题 微服务间基于Feign的调用属于同步方式,存在一些问题。
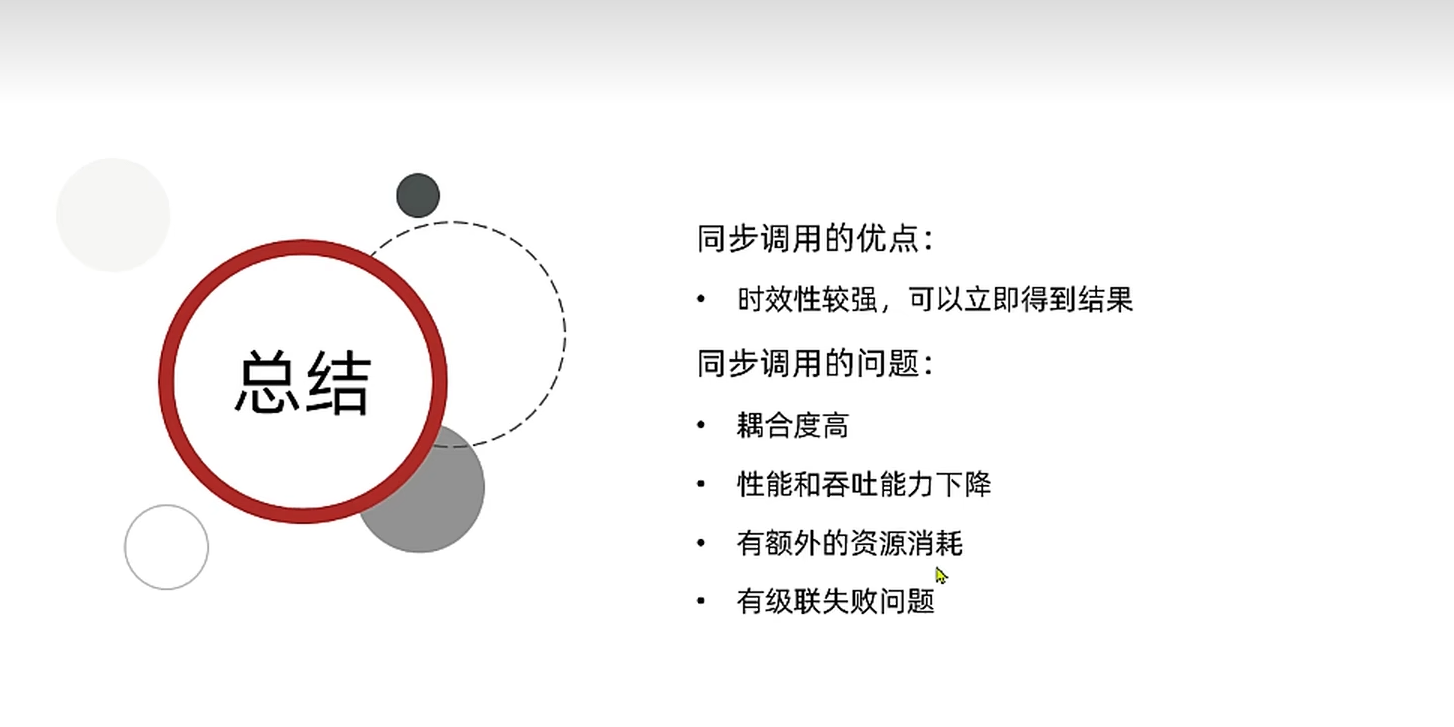
总结 同步调用的优点
同步调用的问题
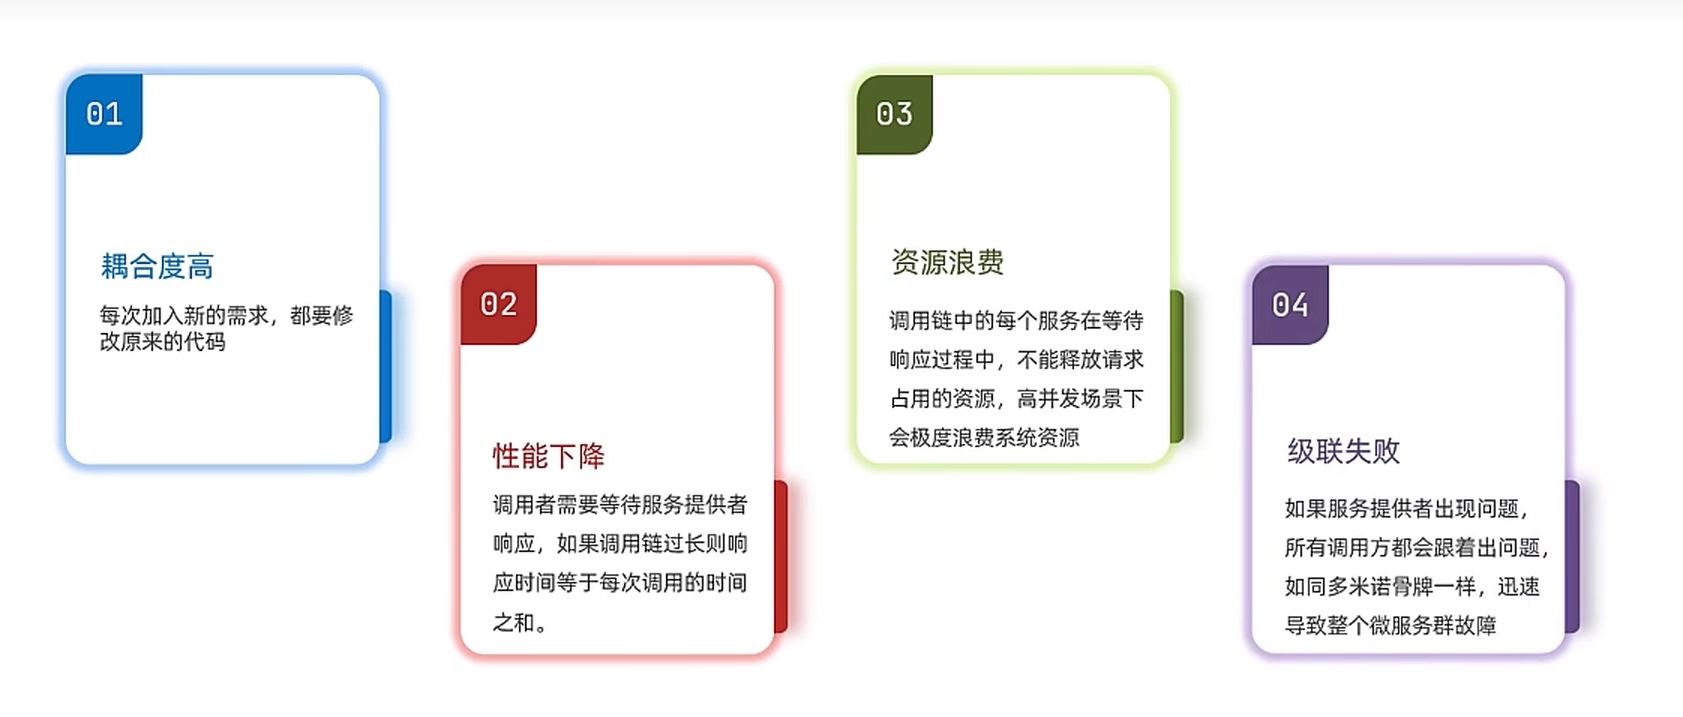
耦合性高
性能和吞吐能力下降
有额外的资源消耗
有级联失败的问题
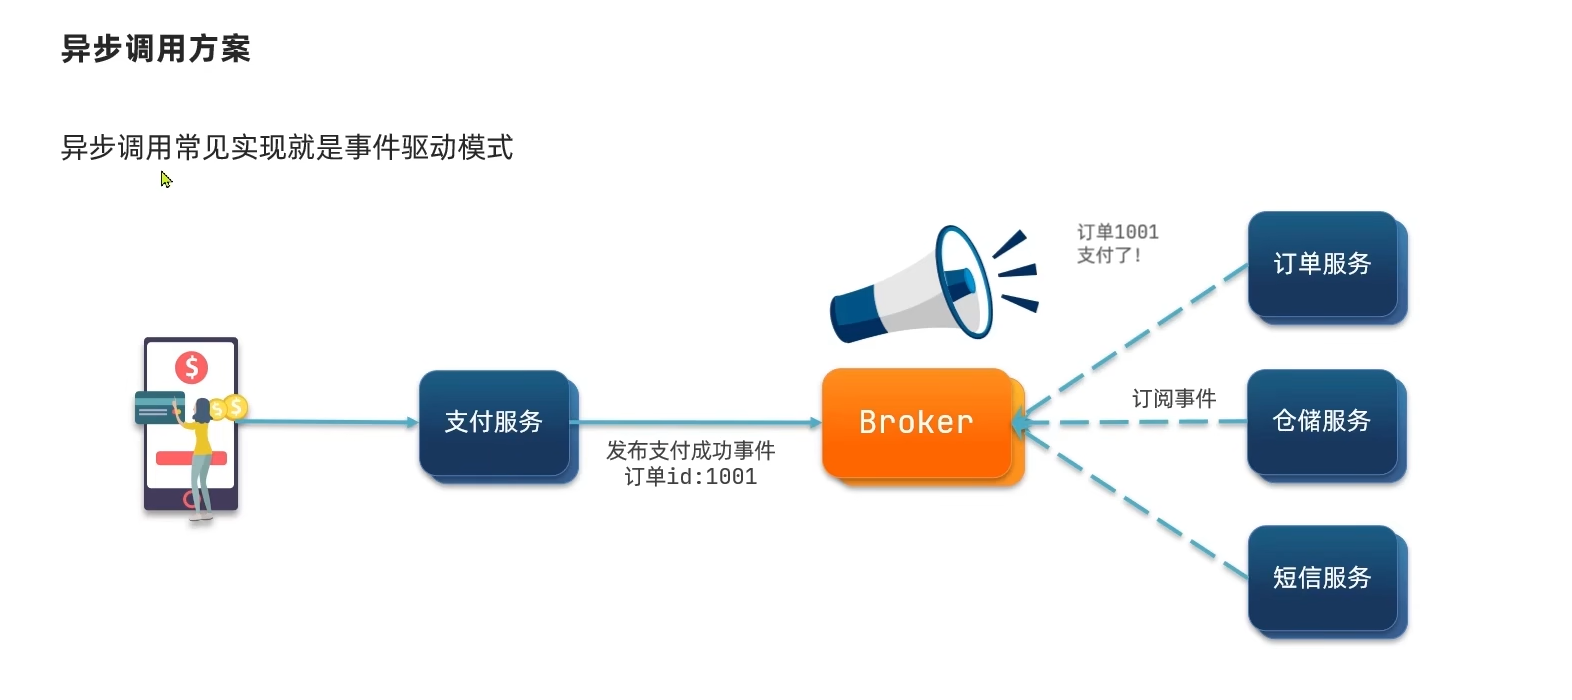
异步调用方案 异步调用常见的实现是事件驱动模式
异步通信的优点:
优势一:通过事件发布完成服务解耦,耦合度低
优势二:性能提升,吞吐量提高
优势三:服务没有强依赖,不担心级联失败问题,故障隔离
优势四:流量削峰
异步通信的缺点:
依赖于Broken的可靠性,安全性,吞吐能力
架构复杂,业务没有明显的流程线,不易于追踪管理
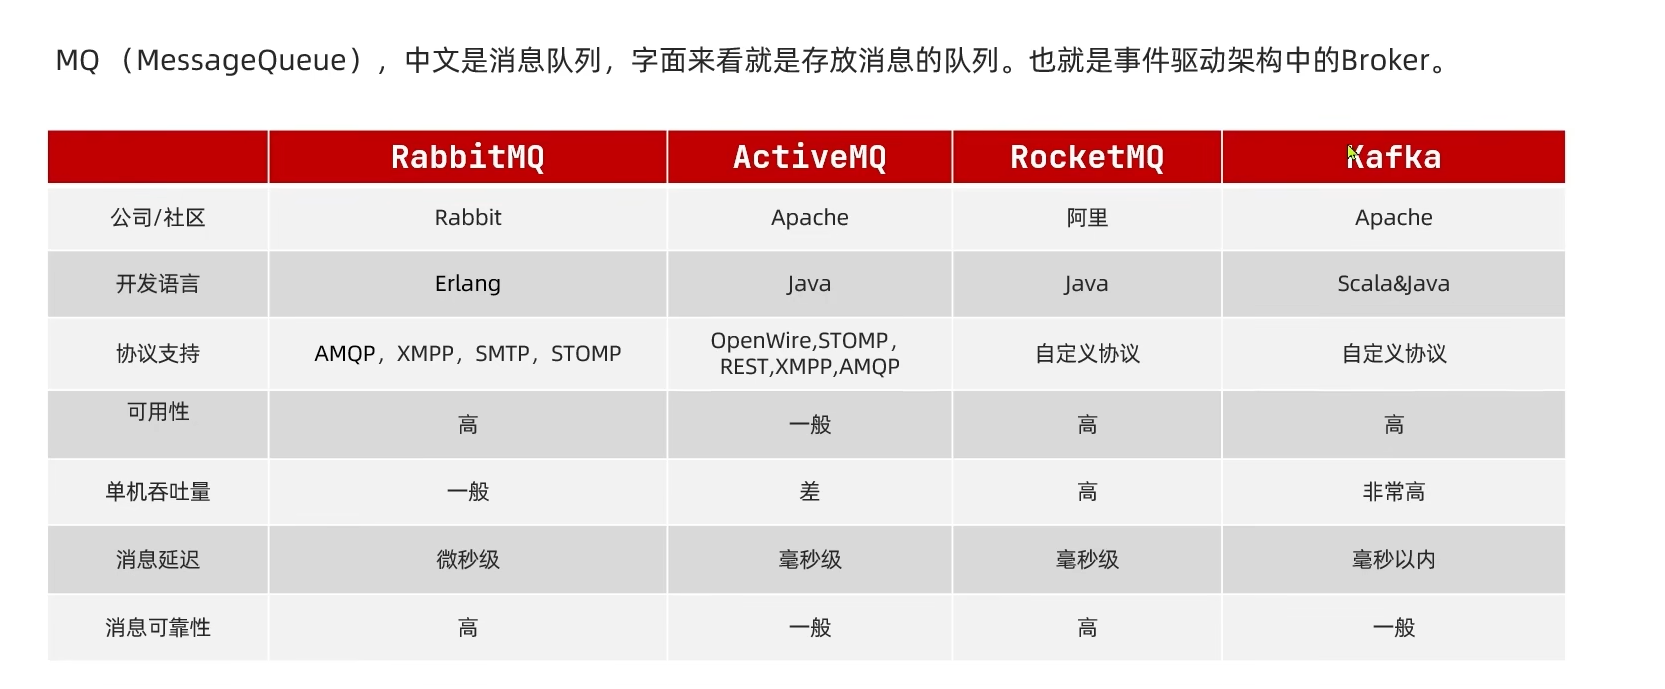
MQ MQ(Message Queue)是消息队列,存放消息的队列,就是事件驱动架构的Broker。
RabbitMQ RabbitMQ是基于Erlang语言开发的开源通信中间件。
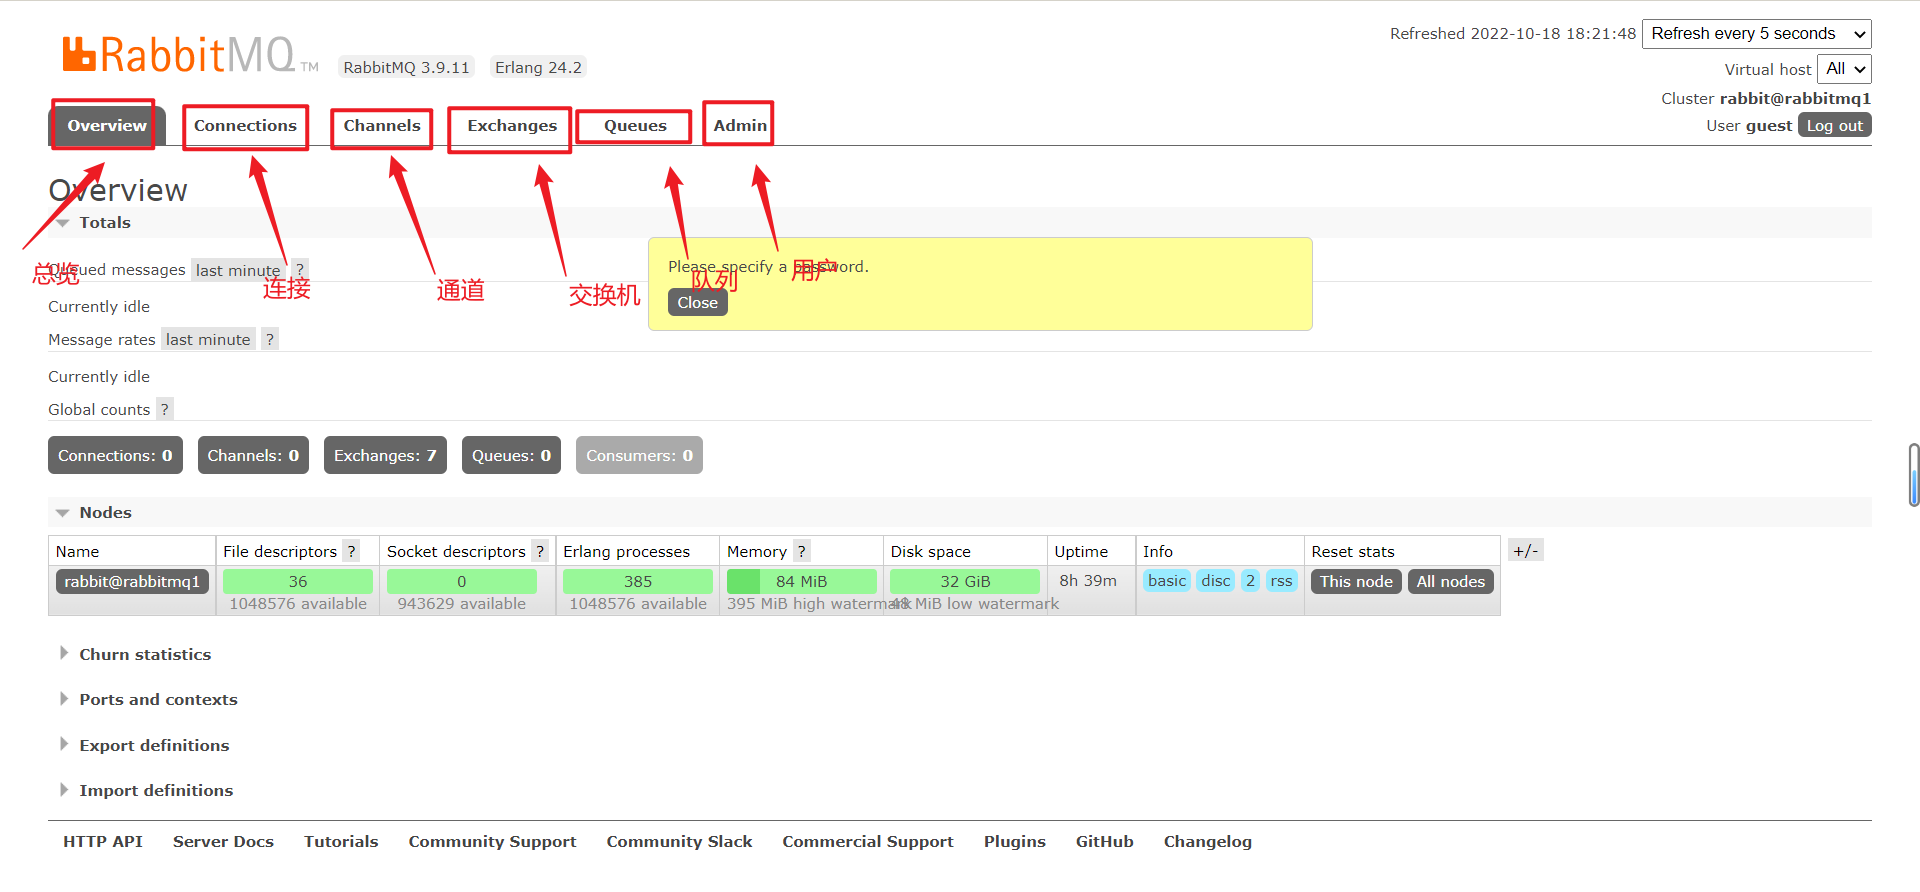
RabbitMQ部署 下载docker镜像 1 docker pull rabbitmq:3.9-management
启动RabbitMQ服务 1 2 3 4 5 docker run \ -p 5672:5672 -p 15672:15672 \ --name rabbitmq \ --hostname rabbitmq1 \ -d rabbitmq:3.9-management
访问地址: http://{ip}:15672/
输入初始的账号密码:guest guset
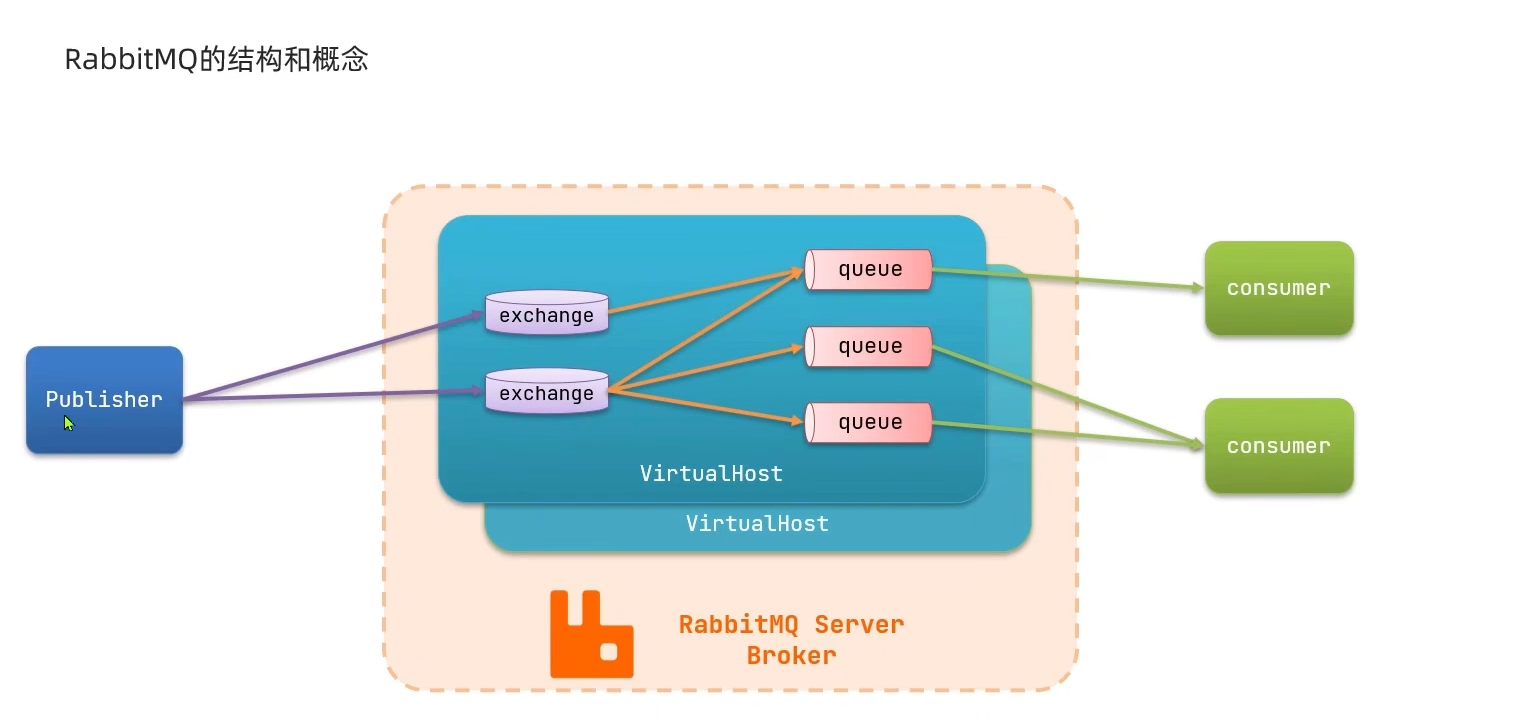
RabbitMQ的结构和概念
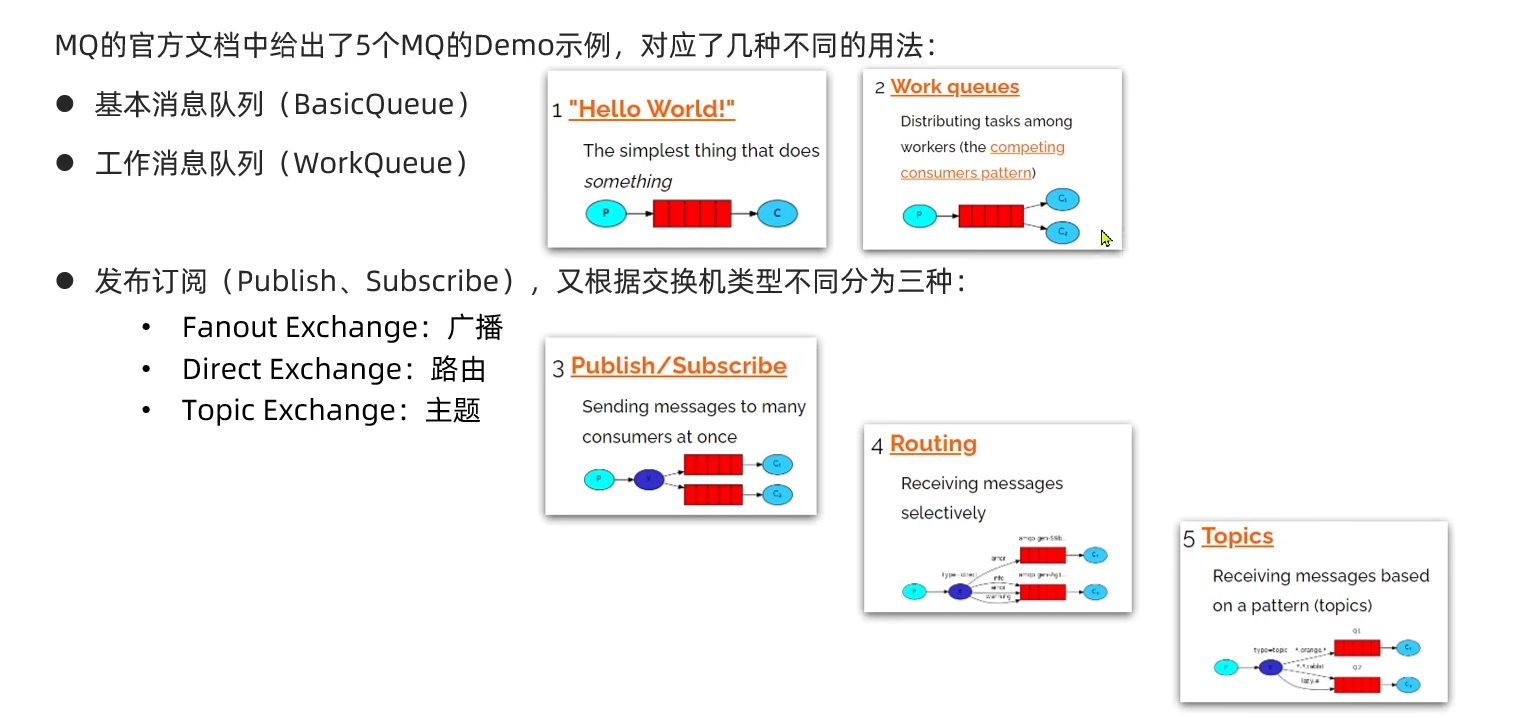
RabbitMQ的概念 channel:操作队列的工具 exchange:路由消息到队列中 queue:缓存消息 virtual:虚拟主机是对queue和exchange等资源的逻辑分组 RabbitMQ常见消息模型
基本消息队列(BasicQueue)
工作消息队列(WorkQueue)
发布订阅(Publish\Subscribe)
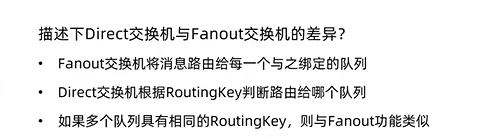
Fanout Exchange:广播
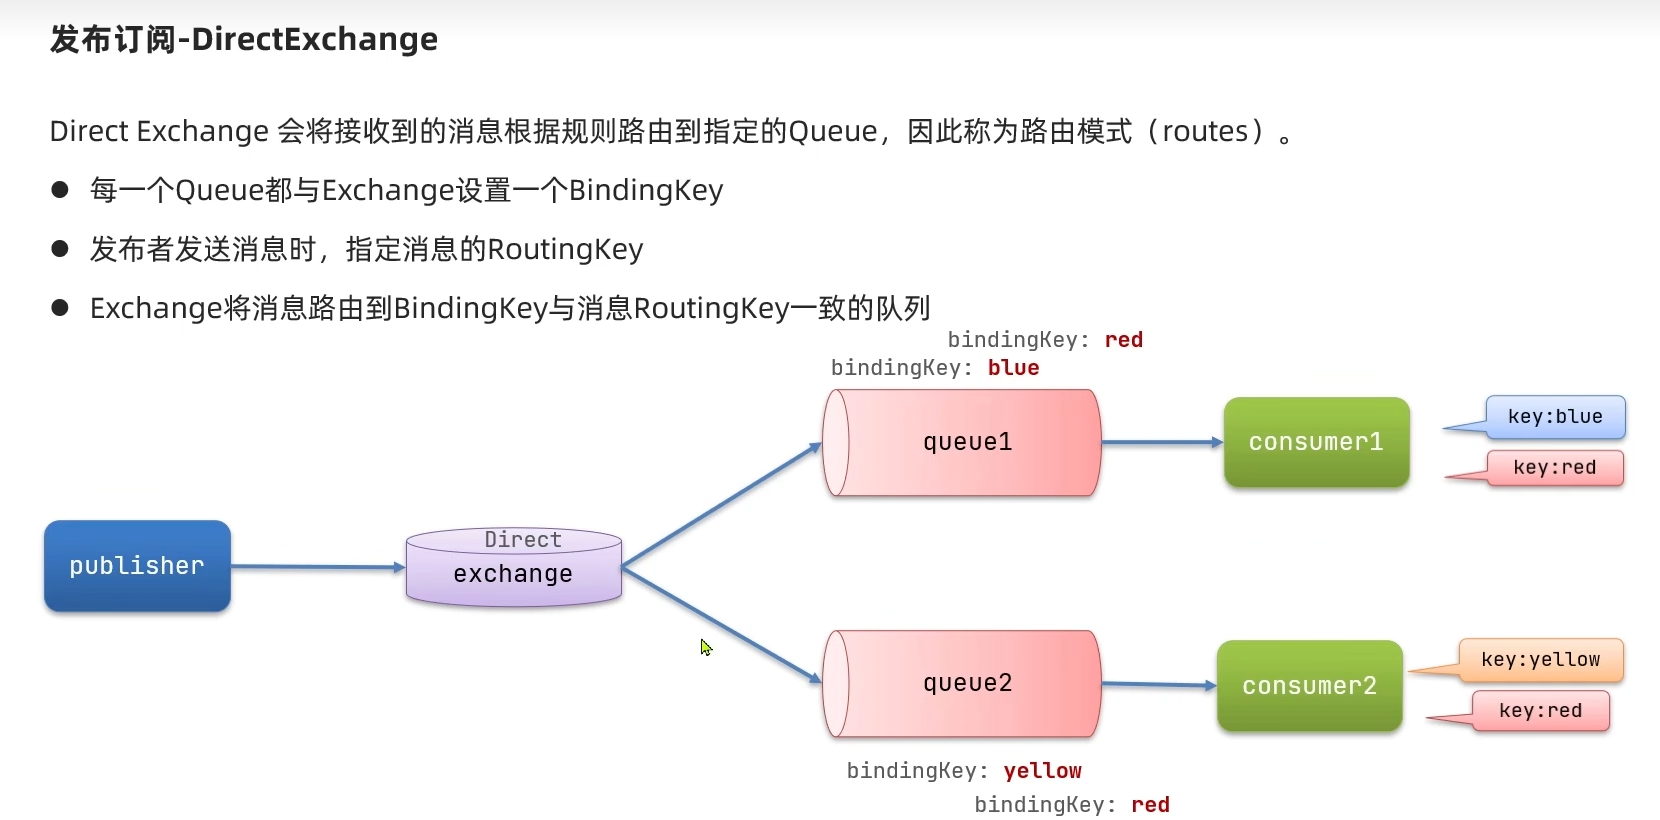
Direct Exchange:路由
Topic Exchange:主题
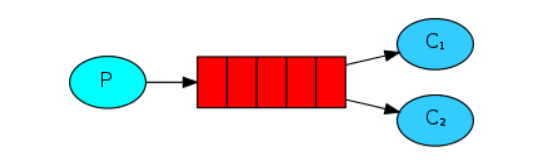
基本消息队列 最基本的消息队列模型只包括三个角色:
publisher:消息发布者,将消息发送到队列queue
queue:消息队列,负责接受并缓存消息
consumer:订阅队列,处理队列中的消息
基本案例
导入依赖
1 2 3 4 5 <dependency > <groupId > org.springframework.boot</groupId > <artifactId > spring-boot-starter-amqp</artifactId > </dependency >
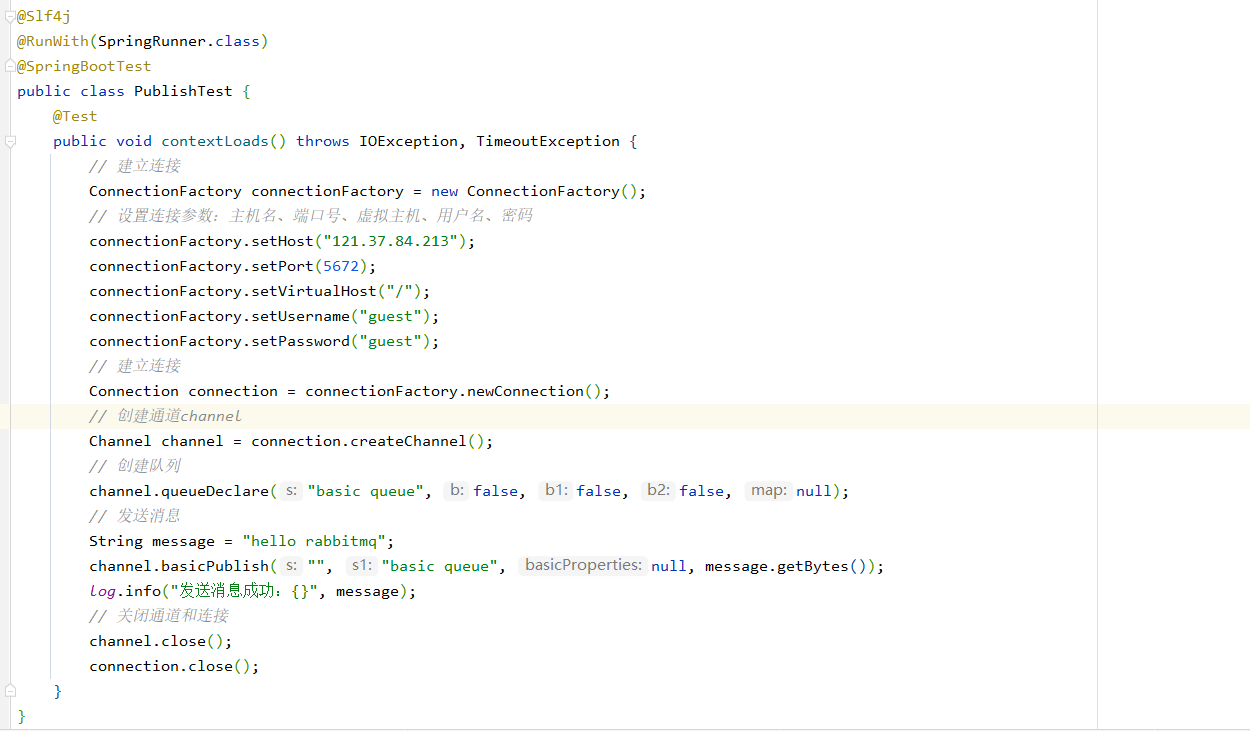
生产者测试类
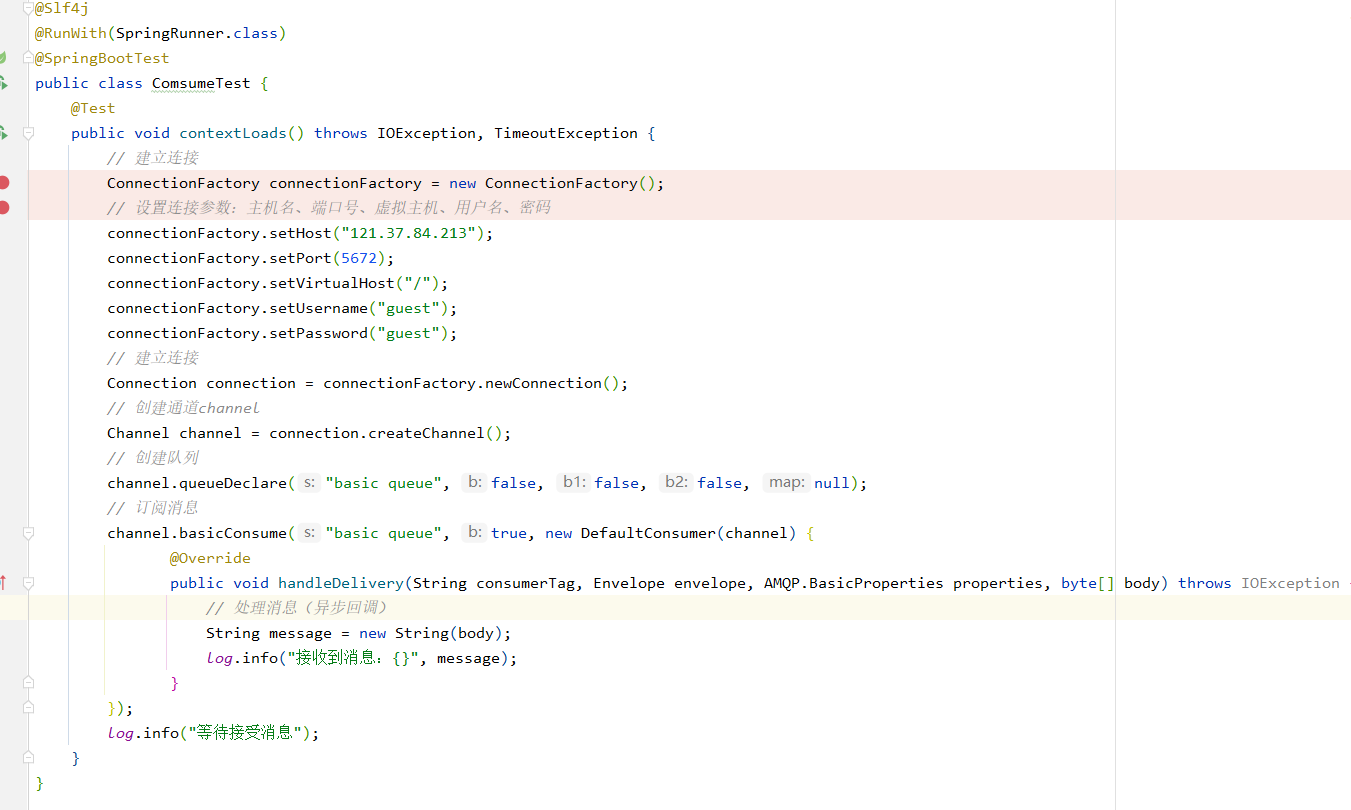
消费者测试类
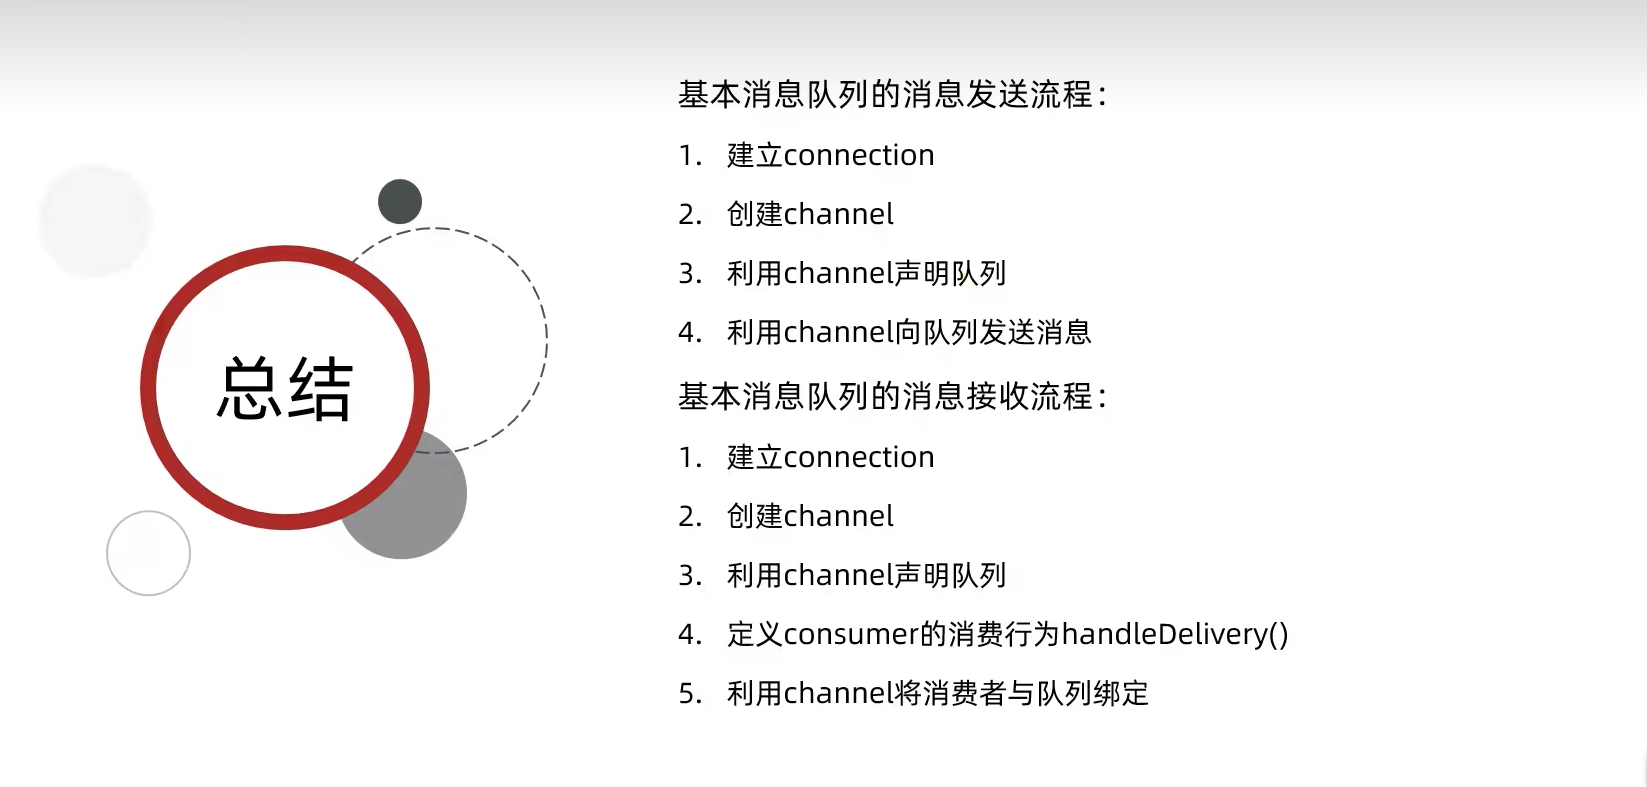
基本消息队列的消息发送流程
建立connect
创建channel
利用channel声明队列
利用channel向队列发送消息
基本消息队列的消息接收流程
建立connect
创建channel
利用channel声明队列
定义consumer的消息行为handleDelivery()
利用channel将消费者和与队列绑定
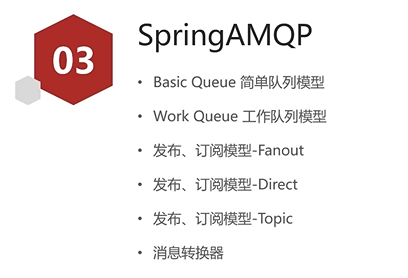
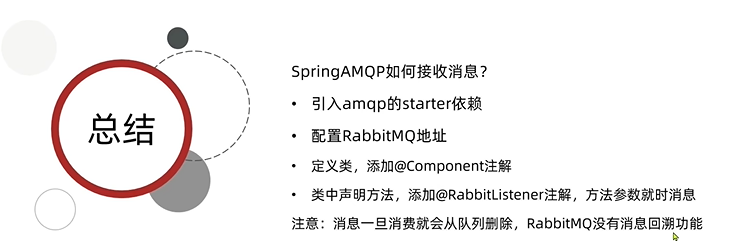
SpringAMQP
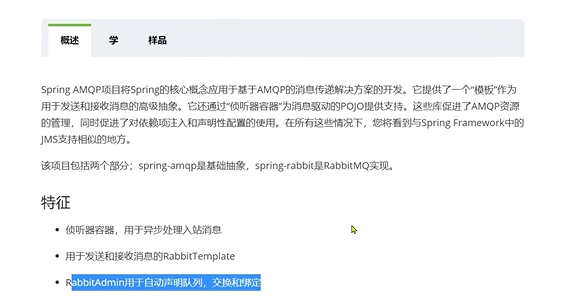
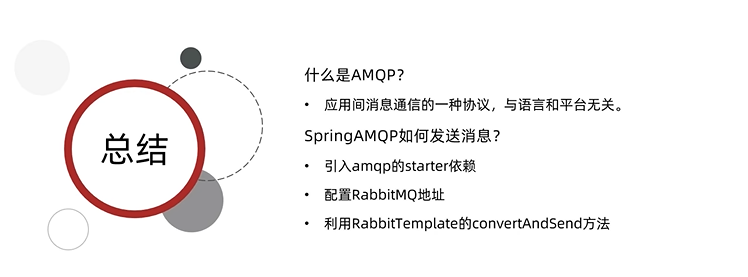
AMQP(Advance Message Queuing Protocol),用于在应用程序或之间传递业务消息的开放标准。该协议与语言和平台无关,更符合微服务中独立性的要求。
Spring AMQP是基于AMQP协议定义的一套 API规范,提供了模板来发送和接收消息,包含两部分,其中spring-amqp是基础抽象,spring-rabbit是底层的默认实现。
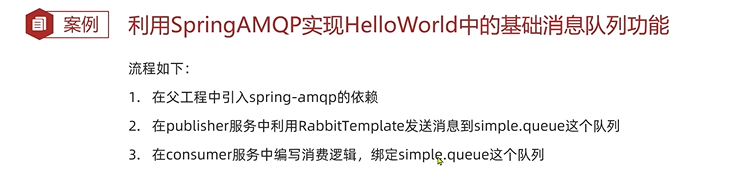
简单模式
简单模式是最简单的消费模式,它包含一个生产者,一个消费者和一个队列。生产者向队列里发送消息。消费者从队列中获取消息并消费。
代码实现 在父工程中引入spring-amqp依赖 1 2 3 4 5 <dependency > <groupId > org.springframework.boot</groupId > <artifactId > spring-boot-starter-amqp</artifactId > </dependency >
编写application.yml配置文件 1 2 3 4 5 6 7 spring: rabbitmq: host: 121.37 .84 .213 port: 5672 username: guest password: guest virtual-host: /
注入RabbitTemplate完成消息的发送 1 2 3 4 5 6 7 8 9 10 11 12 13 @Slf4j public class SimpleSender { @Autowired private RabbitTemplate rabbitTemplate; public static final String QUEUE_NAME = "simple.queue" ; public void send () { String message = "hello rabbitmq" ; rabbitTemplate.convertAndSend(QUEUE_NAME, message); log.info("send message: {}" , message); } }
通过@RabbitListener注解接受方法 1 2 3 4 5 6 7 8 9 10 11 @Slf4j @RabbitListener(queues = "simple.queue") public class SimpleReceiver { @Autowired private RabbitTemplate rabbitTemplate; @RabbitHandler public void receive (String msg) throws InterruptedException { log.info("receive : {}" , msg); } }
通过controller测试发送和接受方法 1 2 3 4 5 6 7 8 9 10 11 12 13 14 15 16 17 18 @RestController @RequestMapping("/rabbit") @Api(tags = "RabbitController", description = "RabbitMQ Amqp功能测试控制器") public class SimpleController { @Resource private SimpleSender simpleSender; @ApiOperation(value = "简单模式消息队列发送消息") @GetMapping(value = "/simpleSend") public CommonResult simpleSend () { for (int i = 0 ; i < 10 ; i++) { simpleSender.send(); ThreadUtil.sleep(1000 ); } return CommonResult.success(null ); } }
总结
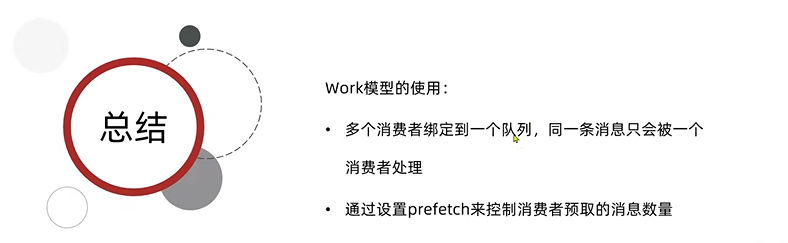
工作模式
工作模式是指向多个相互竞争的消费者发送消息的模式,它包含一个生产者、两个消费者和一个队列。两个消费者同时绑定到一个队列上,当消费者获取消息处理耗时任务时,空闲的消费者从队列中获取并消费消息。
代码实现
添加相关配置,注入队列、生产者和消费者 1 2 3 4 5 6 7 8 9 10 11 12 13 14 15 16 17 18 19 20 21 22 @Configuration public class WorkRabbitConfig { @Bean public Queue workQueue () { return new Queue ("work.queue" ); } @Bean public WorkReceiver workReceiver1 () { return new WorkReceiver (1 ); } @Bean public WorkReceiver workReceiver2 () { return new WorkReceiver (2 ); } @Bean public WorkSender workSender () { return new WorkSender (); } }
生产者通过send方法向队列中发送消息 1 2 3 4 5 6 7 8 9 10 11 12 13 14 15 16 17 18 19 @Slf4j public class WorkSender { @Autowired private RabbitTemplate rabbitTemplate; private static final String QUEUE_NAME = "work.queue" ; public void send (int index) { StringBuilder sb = new StringBuilder ("hello work" ); int limitIndex = index % 3 + 1 ; for (int i = 0 ; i < limitIndex; i++) { sb.append("." ); } sb.append(index + 1 ); String message = sb.toString(); rabbitTemplate.convertAndSend(QUEUE_NAME, message); log.info("send message: {}" , message); } }
消费者从队列中获取消息 1 2 3 4 5 6 7 8 9 10 11 12 13 14 15 16 17 18 19 20 21 22 23 24 25 26 27 @Slf4j @RabbitListener(queues = "work.queue") public class WorkReceiver { private final int instance; public WorkReceiver (int instance) { this .instance = instance; } @RabbitHandler public void receive (String message) { StopWatch stopWatch = new StopWatch (); stopWatch.start(); log.info("instance {} receive {}" , this .instance, message); doWork(message); stopWatch.stop(); log.info("instance {} Done in {}" , this .instance, stopWatch.getTotalTimeMillis()); } private void doWork (String message) { for (char ch : message.toCharArray()) { if (ch == '.' ) { ThreadUtil.sleep(1000 ); } } } }
总结
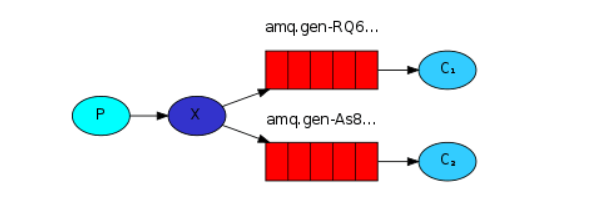
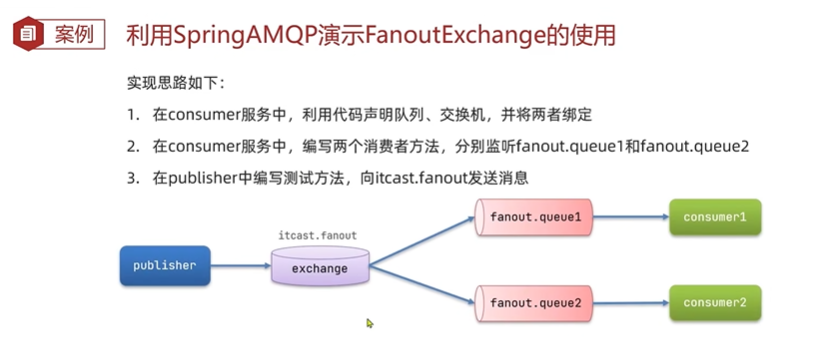
发布订阅模式(Publish/Subscribe)
发布订阅模式与之前模式的区别是允许将同一消息发送给多个消费者,实现方式是加入exchange(交换机)。
发布/订阅模式是指同时向多个消费者发送消息的模式(类似广播的形式),它包含一个生产者、两个消费者、两个队列和一个交换机。两个消费者同时绑定到不同的队列中去,两个队列绑定到交换机上去,生产者通过发送消息到交换机,所有消息者接收并消费消息。
Fanout Exchange会将接收到的消息路由到每一个跟其绑定的queue。
代码实现
添加发布/订阅模式相关Java配置 1 2 3 4 5 6 7 8 9 10 11 12 13 14 15 16 17 18 19 20 21 22 23 24 25 26 27 28 29 30 31 32 33 34 35 36 37 38 39 40 41 42 43 @Configuration public class FanoutRabbitConfig { @Bean public FanoutExchange fanoutExchange () { return new FanoutExchange ("fanout.exchange" ); } @Bean public Queue fanoutQueue1 () { return new Queue ("fanout.queue1" ); } @Bean public Queue fanoutQueue2 () { return new Queue ("fanout.queue2" ); } @Bean public Binding fanoutBinding1 (FanoutExchange fanoutExchange, Queue fanoutQueue1) { return BindingBuilder.bind(fanoutQueue1) .to(fanoutExchange); } @Bean public Binding fanoutBinding2 (FanoutExchange fanoutExchange, Queue fanoutQueue2) { return BindingBuilder.bind(fanoutQueue2) .to(fanoutExchange); } @Bean public FanoutSender fanoutSender () { return new FanoutSender (); } @Bean public FanoutReceiver fanoutReceiver () { return new FanoutReceiver (); } }
生产者向交换机发送消息 1 2 3 4 5 6 7 8 9 10 11 12 13 14 15 16 17 18 19 @Slf4j public class FanoutSender { @Autowired private RabbitTemplate rabbitTemplate; private static final String EXCHANGE_NAME = "fanout.exchange" ; public void send (int index) { StringBuilder sb = new StringBuilder (); int limitIndex = index % 3 + 1 ; for (int i = 0 ; i < limitIndex; i++) { sb.append('.' ); } sb.append(index); String message = sb.toString(); rabbitTemplate.convertAndSend(EXCHANGE_NAME, "" , message); log.info("send:{}" , message); } }
消费者从绑定的匿名队列中获取消息 1 2 3 4 5 6 7 8 9 10 11 12 13 14 15 16 17 18 19 20 21 22 23 24 25 26 27 28 29 @Slf4j public class FanoutReceiver { @RabbitListener(queues = "fanout.queue1") public void receive1 (String message) { receive(message, 1 ); } @RabbitListener(queues = "fanout.queue2") public void receive2 (String message) { receive(message, 2 ); } private void receive (String message, int receiver) { StopWatch stopWatch = new StopWatch (); stopWatch.start(); log.info("instance {} receive {}" , receiver, message); doWork(message); stopWatch.stop(); log.info("instance {} done in {}s" , receiver, stopWatch.getTotalTimeMillis()); } private void doWork (String message) { for (char ch : message.toCharArray()) { if (ch == '.' ) { ThreadUtil.sleep(1000 ); } } } }
controller中添加测试接口 1 2 3 4 5 6 7 8 9 10 11 12 13 14 15 16 17 18 @RestController @RequestMapping("/rabbit") @Api(tags = "RabbitController", description = "RabbitMQ Amqp功能测试控制器") public class RabbitController { @Resource private FanoutSender fanoutSender; @ApiOperation(value = "发布/订阅模式消息队列发送消息") @GetMapping(value = "/fanout") public CommonResult fanout () { for (int i = 0 ; i < 10 ; i++) { fanoutSender.send(i); ThreadUtil.sleep(1000 ); } return CommonResult.success(null ); } }
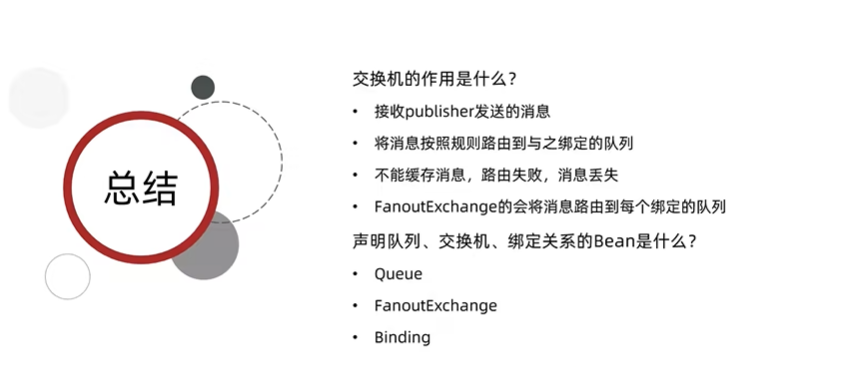
总结 交换机的作用:
接收publisher发送的消息
将消息按照规则路由到与之绑定的队列
不能缓存消息,路由失败,消息丢失
FanoutExchange的会将消息路由到每个绑定的队列
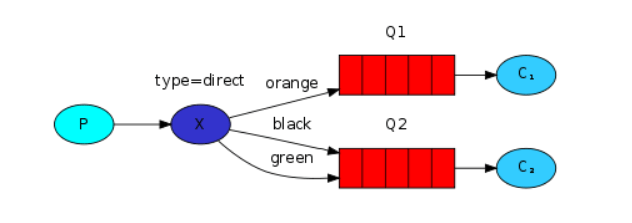
路由模式
路由模式是可以根据路由键选择性给多个消费者发送消息的模式,它包含一个生产者、两个消费者、两个队列和一个交换机。两个消费者同时绑定到不同的队列上去,两个队列通过路由键绑定到交换机上去,生产者发送消息到交换机,交换机通过路由键转发到不不同的队列中,队列绑定的消费者接收并消费消息。
DirectExchange
代码实现 添加路由模式相关Java配置 1 2 3 4 5 6 7 8 9 10 11 12 13 14 15 16 17 18 19 20 21 22 23 24 25 26 27 28 29 30 31 32 33 34 35 36 37 38 39 40 41 42 43 44 45 46 47 @Configuration public class DirectRabbitConfig { @Bean public DirectExchange directExchange () { return new DirectExchange ("direct.exchange" ); } @Bean public Queue directQueue1 () { return new Queue ("direct.queue1" ); } @Bean public Queue directQueue2 () { return new Queue ("direct.queue2" ); } @Bean public Binding directBindingRed1 (DirectExchange directExchange, Queue directQueue1) { return BindingBuilder.bind(directQueue1).to(directExchange).with("red" ); } @Bean public Binding directBindingBlack1 (DirectExchange directExchange, Queue directQueue1) { return BindingBuilder.bind(directQueue1).to(directExchange).with("black" ); } @Bean public Binding directBindingYellow2 (DirectExchange directExchange, Queue directQueue2) { return BindingBuilder.bind(directQueue2).to(directExchange).with("yellow" ); } @Bean public Binding directBindingBlack2 (DirectExchange directExchange, Queue directQueue2) { return BindingBuilder.bind(directQueue2).to(directExchange).with("black" ); } @Bean public DirectSender directSender () { return new DirectSender (); } @Bean public DirectReceiver directReceiver () { return new DirectReceiver (); } }
生产者使用不同的路由键发送消息 1 2 3 4 5 6 7 8 9 10 11 12 13 14 15 16 17 18 19 @Slf4j public class DirectSender { @Autowired private RabbitTemplate rabbitTemplate; private static final String directExchange = "direct.exchange" ; private final String[] keys = {"red" , "yellow" , "green" , "black" }; public void send (int index) { StringBuilder sb = new StringBuilder (); int limitIndex = index % 4 ; String key = keys[limitIndex]; sb.append(key).append(' ' ).append(index + 1 ); String message = sb.toString(); rabbitTemplate.convertAndSend(directExchange, key, message); log.info("send:{}" , message); } }
消费者从绑定的队列中获取消息 1 2 3 4 5 6 7 8 9 10 11 12 13 14 15 16 17 18 19 20 21 22 23 24 25 26 27 28 29 @Slf4j public class DirectReceiver { @RabbitListener(queues = "direct.queue1") public void receive1 (String message) { receive(message, 1 ); } @RabbitListener(queues = "direct.queue2") public void receive2 (String message) { receive(message, 2 ); } public void receive (String message, int receive) { StopWatch stopWatch = new StopWatch (); stopWatch.start(); log.info("instance {} receive : {}" , receive, message); doWork(message); stopWatch.stop(); log.info("instance {} done in {}s" , receive, stopWatch.getTotalTimeMillis()); } public void doWork (String message) { for (char ch : message.toCharArray()) { if (ch == '.' ) { ThreadUtil.sleep(1000 ); } } } }
使用@RabbitListener注入和绑定 1 2 3 4 5 6 7 8 @RabbitListener(bindings = @QueueBinding( value = @Queue(name = "direct.queue3"), exchange = @Exchange(name = "direct.exchange", type = ExchangeTypes.DIRECT), key = {"green", "black"} )) public void receive3 (String message) { receive(message, 3 ); }
controller中添加测试接口 1 2 3 4 5 6 7 8 9 10 11 12 13 14 15 16 17 @RestController @RequestMapping("/rabbit") @Api(tags = "RabbitController", description = "RabbitMQ Amqp功能测试控制器") public class RabbitController { @Resource private DirectSender directSender; @ApiOperation(value = "路由模式消息队列发送消息") @GetMapping(value = "/direct") public CommonResult direct () { for (int i = 0 ; i < 10 ; i++) { directSender.send(i); ThreadUtil.sleep(1000 ); } return CommonResult.success(null ); } }
总结
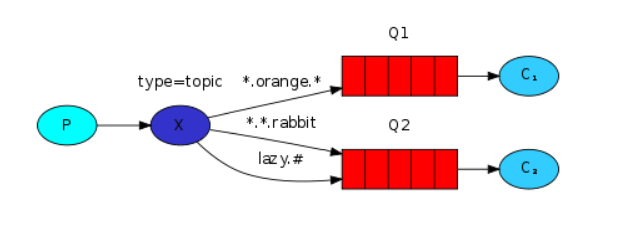
通配符模式
通配符模式是可以根据路由键匹配规则 选择性给多个消费者发送消息的模式,它包含一个生产者、两个消费者、两个队列和一个交换机。
两个消费者同时绑定到不同的队列上去,两个队列通过路由键匹配规则 绑定到交换机上去,生产者发送消息到交换机,交换机通过路由键匹配规则 转发到不同的队列,队列绑定的消费者接收并消费消息。
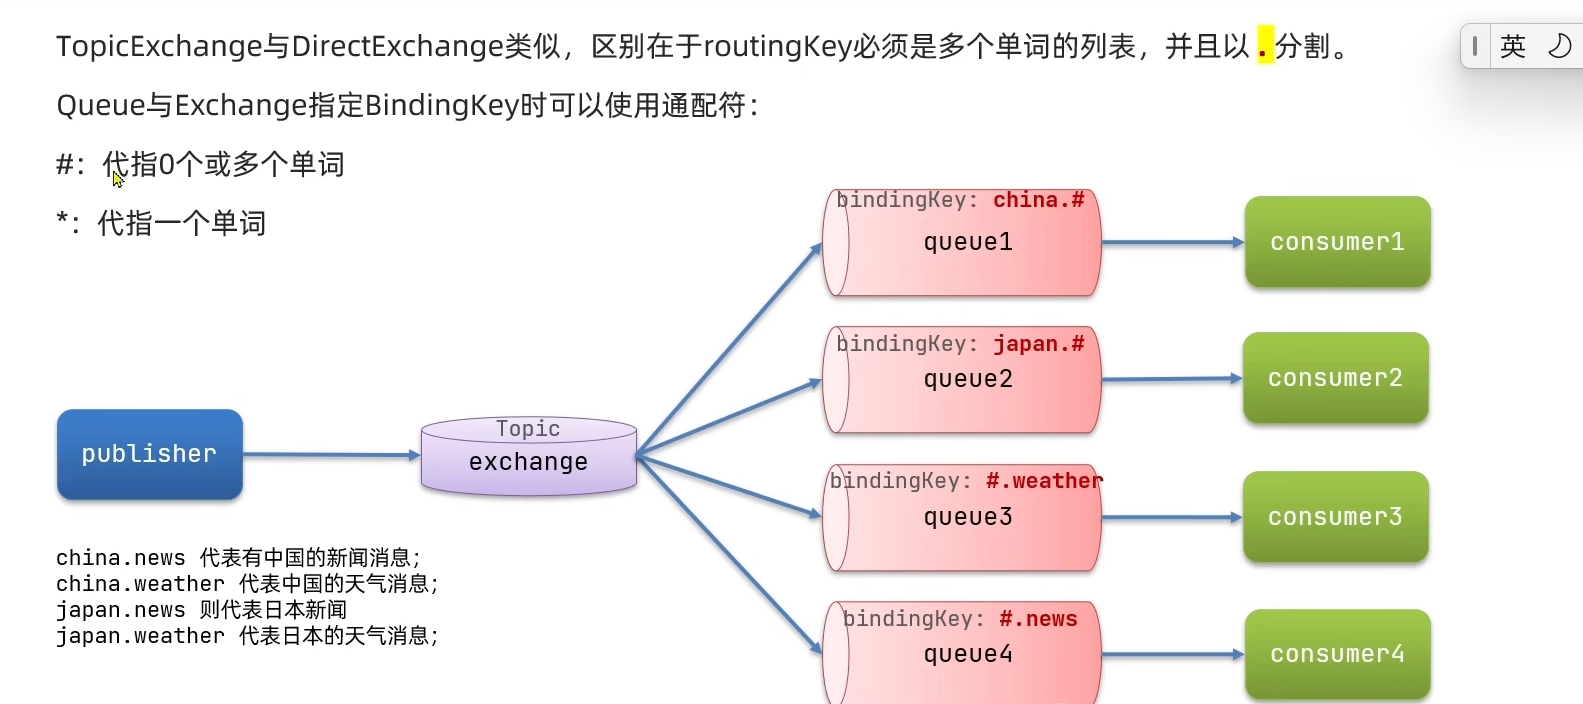
TopicExchange
TopicExchange与DirectExchange类似,区别在于routingKey必须是多个单词的列表,并且以.分割
特殊匹配符号
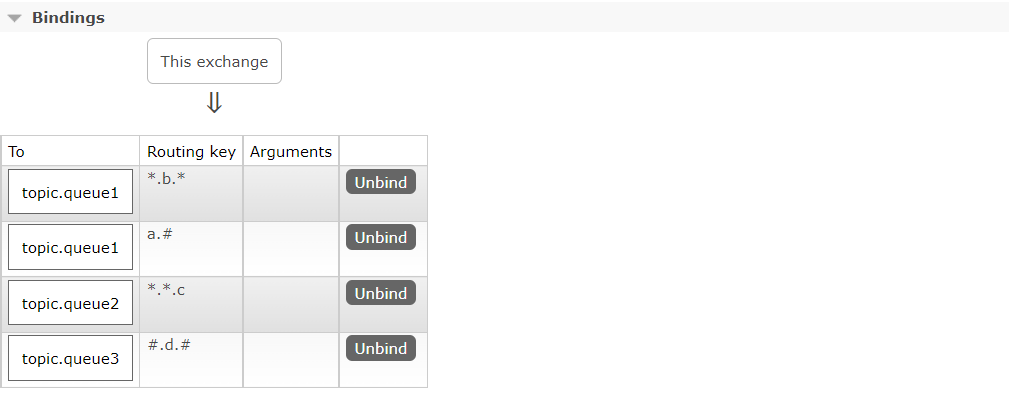
代码实现 添加路由模式相关配置 1 2 3 4 5 6 7 8 9 10 11 12 13 14 15 16 17 18 19 20 21 22 23 24 25 26 27 28 29 30 31 32 33 34 35 36 37 38 39 40 41 42 43 44 45 46 47 @Configuration public class TopicRabbitConfig { @Bean public TopicExchange TopicExchange () { return new TopicExchange ("topic.exchange" ); } @Bean public Queue topicQueue1 () { return new Queue ("topic.queue1" ); } @Bean public Queue topicQueue2 () { return new Queue ("topic.queue2" ); } @Bean public Queue topicQueue3 () { return new Queue ("topic.queue3" ); } @Bean public Binding TopicBinding1a (TopicExchange topicExchange, Queue topicQueue1) { return BindingBuilder.bind(topicQueue1).to(topicExchange).with("a.#" ); } @Bean public Binding TopicBinding1b (TopicExchange topicExchange, Queue topicQueue1) { return BindingBuilder.bind(topicQueue1).to(topicExchange).with("*.b.*" ); } @Bean public Binding TopicBinding2b (TopicExchange topicExchange, Queue topicQueue2) { return BindingBuilder.bind(topicQueue2).to(topicExchange).with("*.*.c" ); } @Bean public TopicSender topicSender () { return new TopicSender (); } @Bean public TopicReceiver topicReceiver () { return new TopicReceiver (); } }
路由模式生产者发送消息 1 2 3 4 5 6 7 8 9 10 11 12 13 14 15 16 17 18 19 @Slf4j public class TopicSender { @Autowired private RabbitTemplate rabbitTemplate; public static final String TOPIC_EXCHANGE = "topic.exchange" ; public final String[] keys ={"a.z.1" , "1.b.2" , "1.3.c" , "2.d.1" }; public void send (int index) { StringBuilder sb = new StringBuilder (); int limitIndex = index % keys.length; String key = keys[limitIndex]; sb.append(key).append(' ' ).append(index + 1 ); String message = sb.toString(); rabbitTemplate.convertAndSend(TOPIC_EXCHANGE, key, message); log.info("send:{}" , message); } }
路由模式生产者接收消息 1 2 3 4 5 6 7 8 9 10 11 12 13 14 15 16 17 18 19 20 21 22 23 24 25 26 27 28 29 30 31 32 33 34 35 @Slf4j public class TopicReceiver { @RabbitListener(queues = "topic.queue1") public void receive1 (String message) { receive(message, 1 ); } @RabbitListener(queues = "topic.queue2") public void receive2 (String message) { receive(message, 2 ); } @RabbitListener(bindings = @QueueBinding(value = @Queue("topic.queue3"), exchange = @Exchange(name = "topic.exchange", type = ExchangeTypes.TOPIC), key = "#.d.#" )) public void receive3 (String message) { receive(message, 3 ); } public void receive (String message, int receive) { StopWatch stopWatch = new StopWatch (); stopWatch.start(); log.info("instance {} receive : {}" , receive, message); doWork(message); stopWatch.stop(); log.info("instance {} done in {}s" , receive, stopWatch.getTotalTimeMillis()); } private void doWork (String in) { for (char ch : in.toCharArray()) { if (ch == '.' ) { ThreadUtil.sleep(1000 ); } } } }
controller中添加测试接口 1 2 3 4 5 6 7 8 9 10 11 12 13 14 15 16 17 @RestController @RequestMapping("/rabbit") @Api(tags = "RabbitController", description = "RabbitMQ Amqp功能测试控制器") public class RabbitController { @Resource private DirectSender directSender; @ApiOperation(value = "适配器模式消息队列发送消息") @GetMapping(value = "/topic") public CommonResult topic () { for (int i = 0 ; i < 10 ; i++) { topicSender.send(i); ThreadUtil.sleep(1000 ); } return CommonResult.success(null ); } }
MessageConverter消息转换器
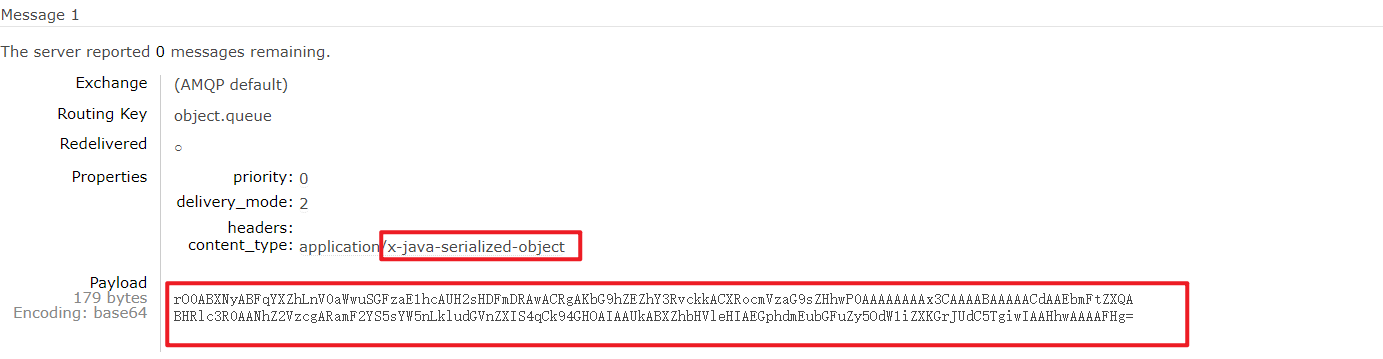
默认情况下,消息体被转换为二进制的数据方式进行传输,SpringAMQP将对象通过JDK的方式进行序列化,这种序列化方式存在一些问题:性能比较差,安全性存在隐患。
基于JDK的ObjectOutputStream进行序列化 新建队列
对指定队列发送消息 1 2 3 4 5 6 7 public void sendObject () { Map<String, Object> map = new HashMap <>(); map.put("name" , "test" ); map.put("age" , 20 ); rabbitTemplate.convertAndSend(OBJECT_QUEUE, map); log.info("send message: {}" , map); }
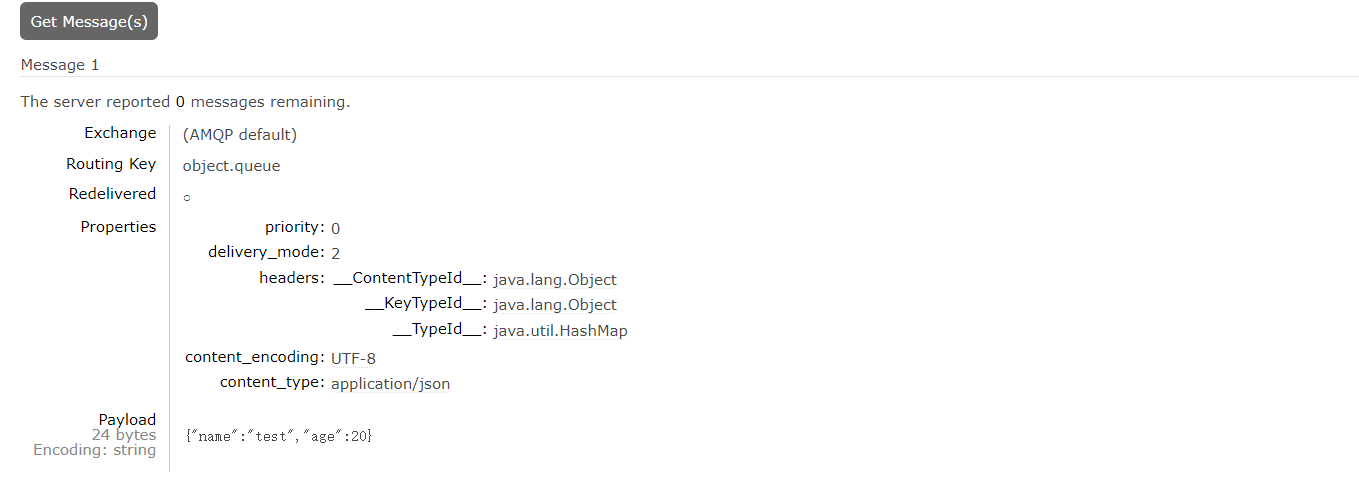
使用JSON方式进行序列化
引入依赖 1 2 3 4 5 6 <dependency > <groupId > com.fasterxml.jackson.dataformat</groupId > <artifactId > jackson-dataformat-xml</artifactId > <version > 2.11.4</version > </dependency >
注入MessageConvert 1 2 3 4 5 6 7 @Configuration public class JacksonConfig { @Bean public MessageConverter jsonMessageConverter () { return new Jackson2JsonMessageConverter (); } }