高级MQ
MQ一些常见问题
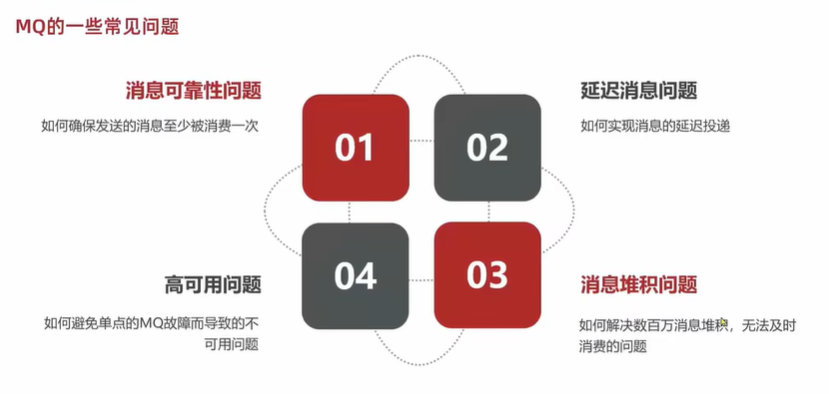
消息可靠性问题:如何确保发送的消息至少被消费一次
延迟消息问题:如何实现消息的延迟投递
消息堆积问题:如何解决数百万消息堆积无法及时消费的问题
高可用问题:如何避免单点的MQ故障而导致的不可用问题
消息可靠性
消费者将消息投递给exchange(交换机),exchange再将消息路由到queue(队列),queue最后将消息投递到consumer(消费者)。
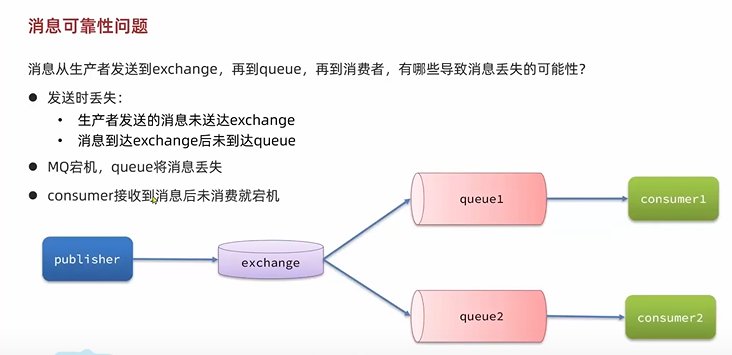
- 发送时丢失
- 生产者发送的消息未送达exchange
- 消息到达exchange后未到达queue
- MQ基于内存存储消息,MQ宕机后,queue里的消息将会丢失
- consumer接收到消息后未消费就宕机
生产者消息确认机制
RabbitMQ提供了publiser confirm机制来避免消息发送到MQ过程中丢失的问题。
消息发送到MQ之后,会返回一个结果给发送者,表示消息是否处理成功。
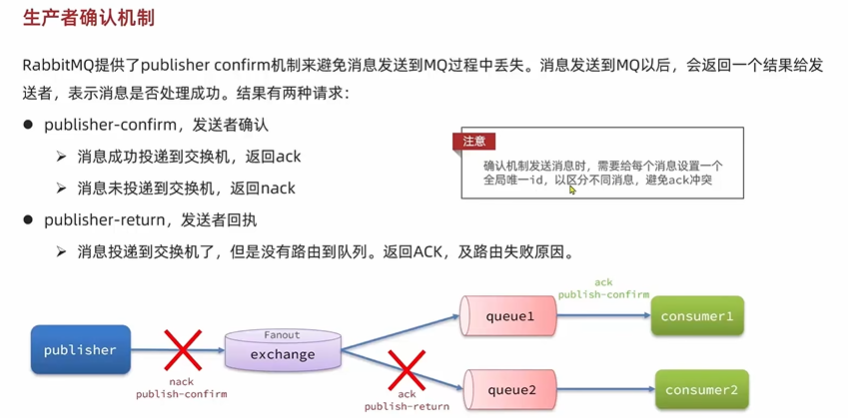
- publisher-confirm:发送者确认
- 消息成功投递到交换机,返回ack
- 消息未投递到交换机,返回nack
- publisher-return:发送者回执
- 消息投递到交换机,但没有路由到队列,返回ack以及路由失败原因
注意:确认机制发送消息时,需要给每个消息设置一个全局唯一id,以区分不同消息,避免ack冲突。
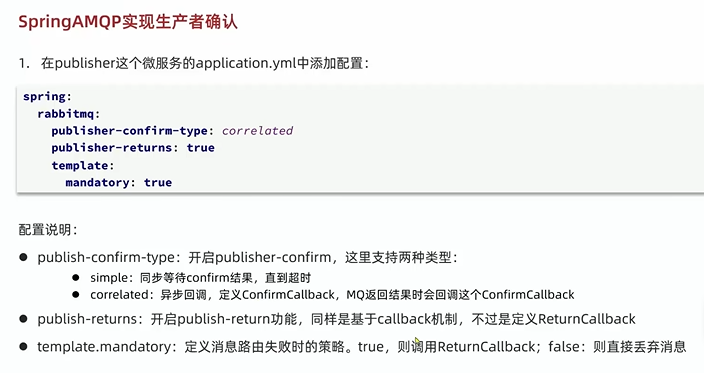
SpringAMQP实现生产者确认
添加配置
1
2
3
4
5
6
| spring:
rabbitmq:
publisher-confirm-type: correlated
publisher-returns: true
template:
mandatory: true
|
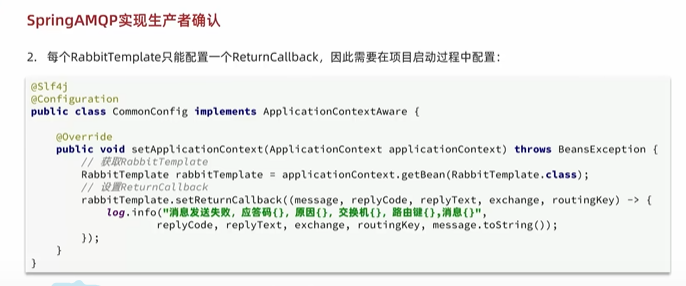
RabbitTemplate配置ReturnCallback
1
2
3
4
5
6
7
8
9
10
11
12
13
| @Slf4j
@Configuration
public class RabbitConfig implements ApplicationContextAware {
@Override
public void setApplicationContext(ApplicationContext applicationContext) throws BeansException {
RabbitTemplate rabbitTemplate = applicationContext.getBean(RabbitTemplate.class);
rabbitTemplate.setReturnCallback((message, replyCode, replyText, exchange, routingKey) ->
log.info("消息发送失败, 应答码:{},原因:{},交换机:{},路由机:{},消息:{}",
replyCode, replyText, exchange, routingKey, message.toString()));
}
}
|
发送消息指定消息ConfirmCallback

1
2
3
4
5
6
7
8
9
10
11
12
13
14
15
16
17
18
19
20
21
| public void send(int index) {
String messgae = "hello world";
CorrelationData correlationData = new CorrelationData(UUID.randomUUID().toString());
correlationData
.getFuture()
.addCallback(result -> {
if (result.isAck()) {
log.debug("消息发送成功,ID:{}", correlationData.getId());
} else {
log.error("消息发送失败,ID:{},原因:{}", correlationData.getId(), result.getReason());
}
},
ex-> log.error("消息发送异常,ID:{},原因:{}", correlationData.getId(), ex.getMessage()));
rabbitTemplate.convertAndSend(directExchange, key, message);
log.info("send:{}", message);
}
|
总结
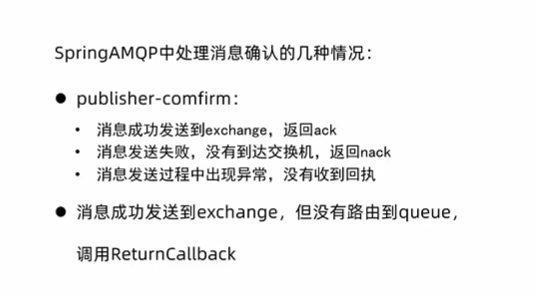
SpringAMQP中消息确认的几种情况
- publisher-confirm
- 消息成功发送到达exchange,返回ack
- 消息发送失败没有到达exchange,返回nack
- 消息发送过程中出现异常,没有收到回执
- publisher-return
- 消息成功发送到exchange,但没有路由到队列中
消息持久化
MQ默认是内存存储消息,开启持久化功能可以确保缓存在MQ中的消息不丢失
交换机持久化
1
2
3
4
5
6
7
| @Bean
public DirectExchange directExchange() {
return (DirectExchange) ExchangeBuilder
.directExchange("direct.exchange")
.durable(true)
.build();
}
|

队列持久化
1
2
3
4
5
6
| @Bean
public Queue directQueue1() {
return QueueBuilder
.durable("direct.queue")
.build();
}
|
消息持久化
SpringAMQP中的消息默认是持久的,可以通过MessageProperties中的DeliveryMode来指定的
1
2
3
4
5
6
7
|
Message message = MessageBuilder.withBody("hello world".getBytes(StandardCharsets.UTF_8))
.setDeliveryMode(MessageDeliveryMode.PERSISTENT)
.build();
rabbitTemplate.convertAndSend(directExchange,message);
|
消费者消息确认机制

RabbitMQ支持消费者确认机制,即消费者处理消息后可以向MQ发送ack回执,MQ收到ack回执后才删除该消息。
SpringAMQP允许三种确认模式
- manual:手动ack,需要在业务代码结束后,调用api发送ack
- auto:自动ack,由spring监测listener代码是否出现异常,没有异常返回ack,抛出异常则返回nack
- none:关闭ack,MQ假定消费者获取消息后成功处理,因此消费投递后立即被删除
1
2
3
4
5
6
| spring:
rabbitmq:
listener:
simple:
prefetch: 1
acknowledge-mode: auto
|
消费失败重试机制
消费者失败重试
当消费者出现异常后,消息会不断的requeue(重新入列)到队列,再重新发送给消费者,然后再次异常,再次requeue,无线循环,导致mq的消息处理飙升,带来不必要的压力。

利用Spring的retry机制,在消费者出现异常时,利用本地重试,而不是无限制的requeue(重新入列)到mq队列。
1
2
3
4
5
6
7
8
9
10
11
12
13
14
| spring:
rabbitmq:
listener:
simple:
prefetch: 1
acknowledge-mode: auto
retry:
enabled: true
initial-interval: 1000
multiplier: 1
max-attempts: 3
max-interval: 10
stateless: true
务,这里默认为false
|
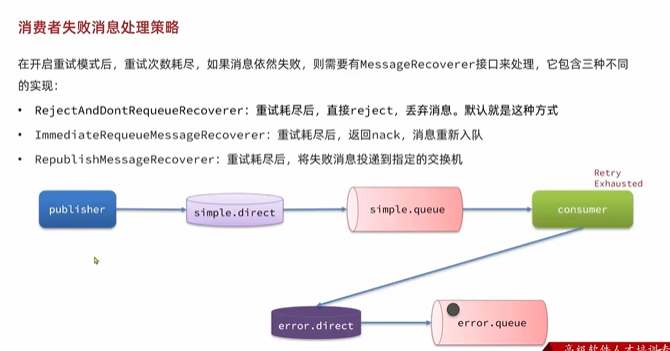
消费者失败消息处理策略
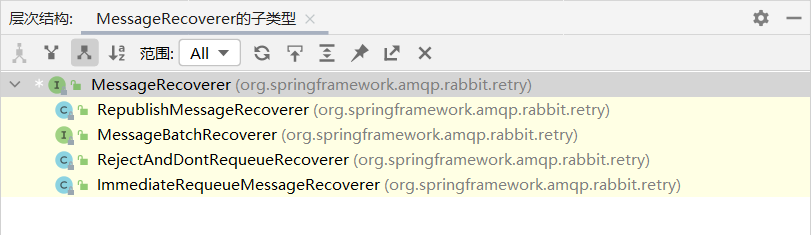
在开启重试模式后,重试次数耗尽,如果消息依旧失败,则需要MessageRecoverer接口来处理。
MessageRecover包含三种不同的实现
- RejectAndDontRequeueRecoverer(默认方式):重试耗尽后,直接reject,丢弃消息。
- ImmediateRequeueMessageRecoverer:重试耗尽后,返回nack,消息重新入队
- RepublishMessageRecoverer:重试耗尽吧,将失败消息投递到指定的交换机
消消费者失败消息处理策略
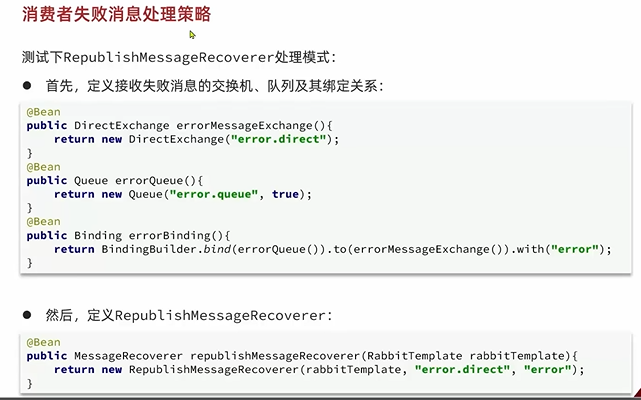
定义绑定失败消息的交换机、队列以及绑定关系
1
2
3
4
5
6
7
8
9
10
11
12
13
14
15
16
17
18
19
20
21
22
23
24
25
26
27
|
@Configuration
public class ErrorRabbitConfig {
@Bean
public FanoutExchange errorExchange() {
return (FanoutExchange) ExchangeBuilder
.directExchange("error.exchange")
.durable(true)
.build();
}
@Bean
public Queue errorQueue() {
return QueueBuilder
.durable("error.queue")
.build();
}
@Bean
public Binding fanoutBinding(FanoutExchange errorExchange, Queue errorQueue) {
return BindingBuilder
.bind(errorQueue)
.to(errorExchange);
}
}
|
定于RepulishMessageRecoverer
1
2
3
4
| @Bean
public MessageRecoverer republisherReceiver(RabbitTemplate rabbirTemplate) {
return new RepublishMessageRecoverer(rabbirTemplate, "error.exchange", "error.queue");
}
|
总结
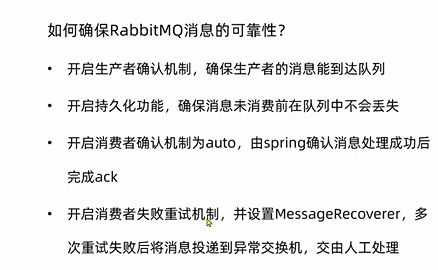
确保RabbitMQ消息的可靠性
- 开启生产者确认机制,确保生产者的消息能到队列
- 开启持久化功能,确保消息未消费前在队列中不会丢失
- 开启消费者确认机制为auto,有spring确认消息处理成功后完成ack
- 开启消费者失败重试机制,并设置MessgeRecoverer,多次重试失败后将消息投递到异常交换机,交由人工处理
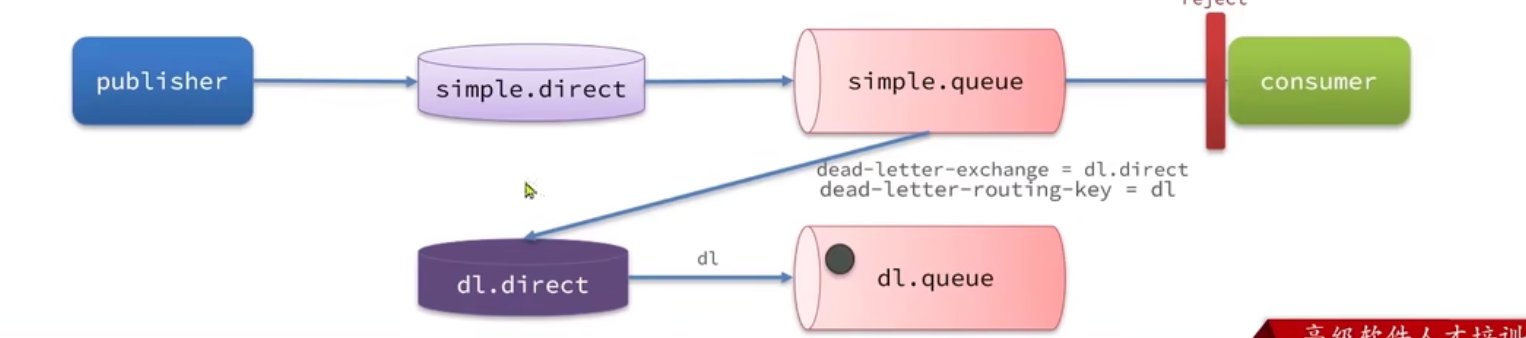
死信交换机
死信
当一个队列中的消息满足下列情况之一,可以成为死信(dead letter):
- 消费者使用basic.reject或者basic.nack声明消费失败,并且消息的requeue参数设置为false
- 消息是一个过期消息,超时无人消费
- 被投递的队列消息堆积满了,最早的消息可能成功死信
如果该队列配置了dead-letter-exchage属性,指定一个交换机,那么队列中的死信就会投递到这个交换机中,而这个交换机称为死信交换机(Dead Letter Exchange,简称DLX)
总结
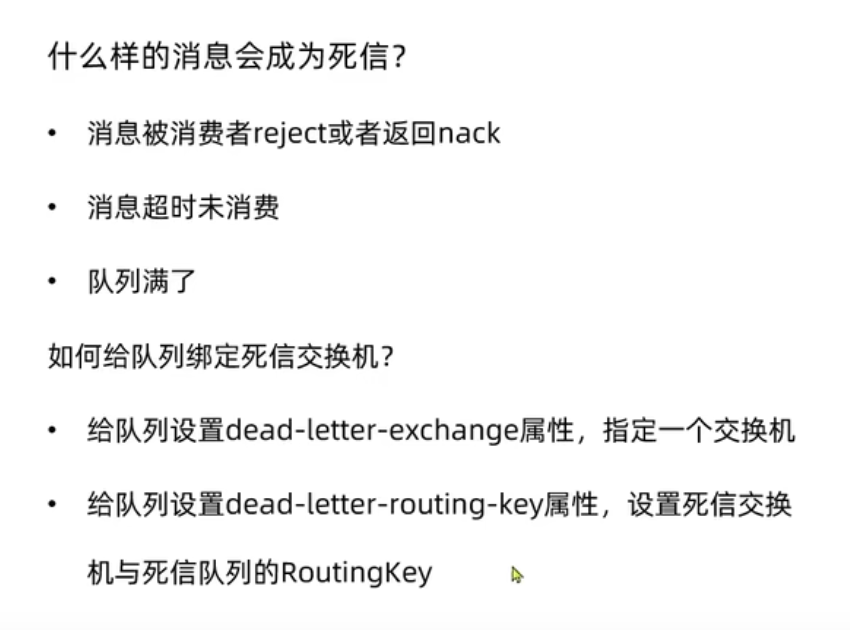
什么消息会成为死信
- 消息被消费者reject或者返回nack
- 消息超时未消费
- 队列满了
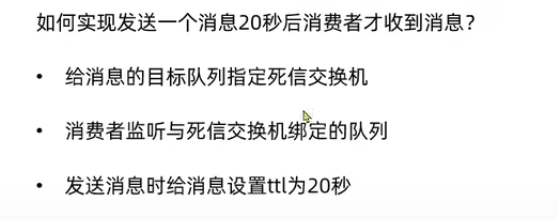
如何给队列绑定死信交换机
- 给队列设置dead-letter-exchange属性,指定一个交换机
- 给队列设置dead-letter-routing-key属性,设置死信交换机与死信队列的RoutingKey
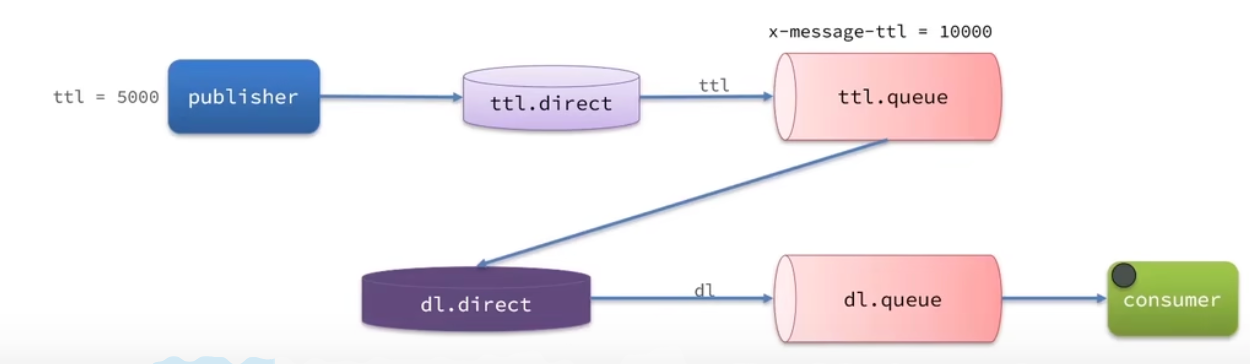
TTL
TTL即Time-To-Live,如果一个队列中的消息TTL结束仍未被消费,则会变成死信
TTL超时分为两种情况:
- 消息所在队列设置了存活时间
- 消息本身设置了存活时间
实现
声明交互机和队列
1
2
3
4
5
6
7
8
9
10
11
12
13
14
15
16
17
18
19
20
21
22
23
24
25
26
27
28
29
30
31
32
33
34
35
36
37
38
39
40
41
42
43
44
45
46
47
48
49
50
51
52
53
|
@Configuration
public class TtlRabbitConfig {
@Bean
public DirectExchange dlExchange() {
return (DirectExchange) ExchangeBuilder
.directExchange(RabbitEnum.QUEUE.getExchange())
.durable(true)
.build();
}
@Bean
public DirectExchange directTtlExchange() {
return (DirectExchange) ExchangeBuilder
.directExchange(RabbitEnum.QUEUE_TTL.getExchange())
.durable(true)
.build();
}
@Bean
public Queue dlQueue() {
return QueueBuilder
.durable(RabbitEnum.QUEUE.getName())
.build();
}
@Bean
public Queue directTtlQueue() {
return QueueBuilder
.durable(RabbitEnum.QUEUE_TTL.getName())
.deadLetterExchange(RabbitEnum.QUEUE.getExchange())
.deadLetterRoutingKey(RabbitEnum.QUEUE.getRouteKey())
.build();
}
@Bean
public Binding messageBinding(DirectExchange dlExchange, Queue dlQueue) {
return BindingBuilder
.bind(dlQueue)
.to(dlExchange)
.with(RabbitEnum.QUEUE.getRouteKey());
}
@Bean
public Binding directTtlBinding(DirectExchange directTtlExchange, Queue directTtlQueue) {
return BindingBuilder
.bind(directTtlQueue)
.to(directTtlExchange)
.with(RabbitEnum.QUEUE_TTL.getRouteKey());
}
}
|
给队列设置超时时间并指定路由
1
2
3
4
5
6
7
8
9
| @Bean
public Queue directTtlQueue() {
return QueueBuilder
.durable(RabbitEnum.QUEUE_TTL.getName())
.deadLetterExchange(RabbitEnum.QUEUE.getExchange())
.deadLetterRoutingKey(RabbitEnum.QUEUE.getRouteKey())
.ttl(10000)
.build();
}
|
发送消息
1
2
3
4
5
6
7
8
9
10
11
12
13
14
15
16
17
18
19
20
21
22
23
24
25
26
27
28
29
30
31
32
33
| @Slf4j
@Component
public class TtlSender {
@Resource
private RabbitTemplate rabbitTemplate;
private final static String message = "hello world";
public void send() {
rabbitTemplate.convertAndSend(
RabbitEnum.QUEUE_TTL.getExchange(),
RabbitEnum.QUEUE_TTL.getRouteKey(),
message,
message -> {
message.getMessageProperties().setExpiration(String.valueOf(1000 * 10));
return message;
}
);
}
}
|
接收消息
1
2
3
4
5
6
7
8
| @Slf4j
@Component
public class TtlReceiver {
@RabbitListener(queues = "direct.dl.queue")
public void receive(String message) {
log.info("接受消息:{}", message);
}
}
|
总结
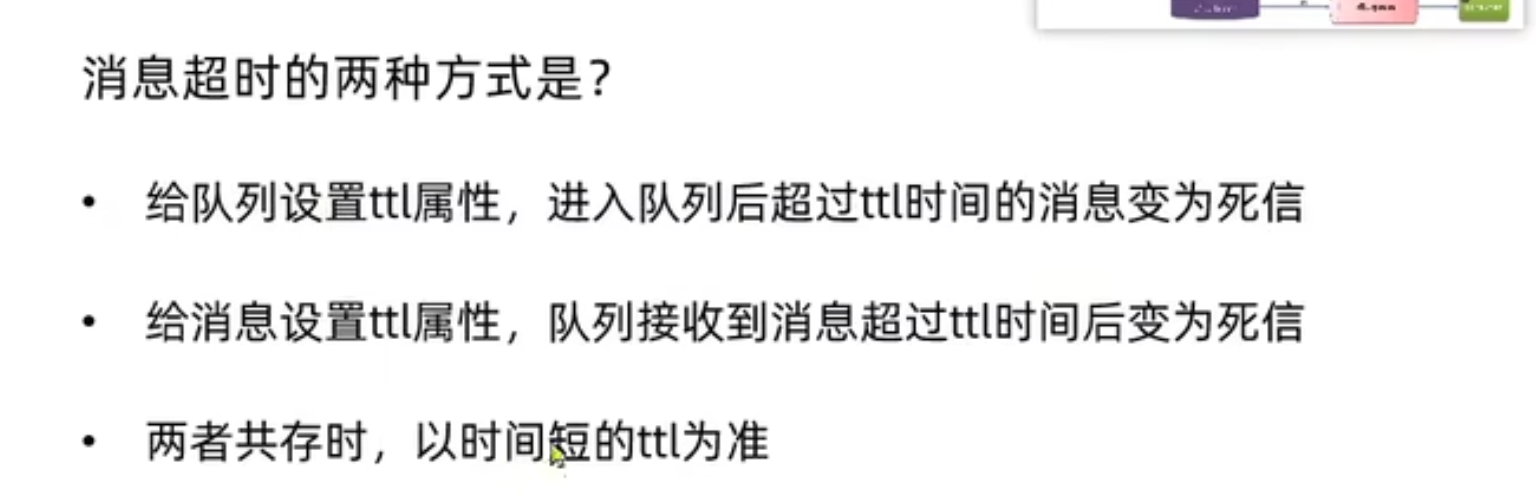
消息超时的两种方式
- 给队列设置ttl属性,进入队列后超过ttl时间的消息会会变成死信
- 给消息设置ttl属性,队列接受到消息超过ttl时间后变成死信
- 两者共存时,以时间短的ttl为准备
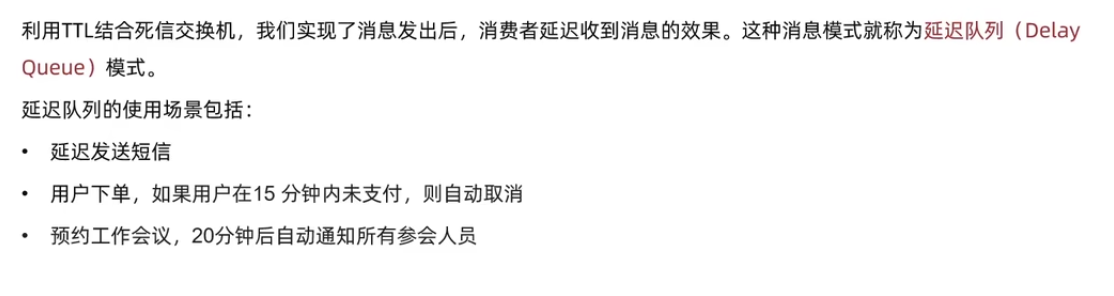
延迟队列
DelayExchange插件
官方插件地址:https://www.rabbitmq.com/community-plugins.html

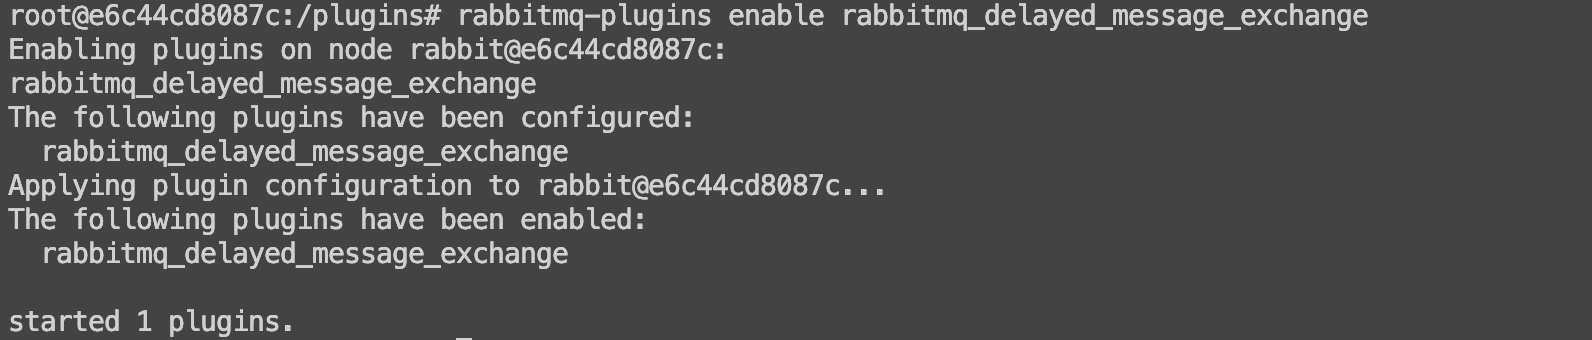
将文件放到挂载目录

进入容器启动插件
1
2
| docker exec -it rabbitmq /bin/bash
rabbitmq-plugins enable rabbitmq_delayed_message_exchange
|
使用插件
DelayExchange插件的原理是对官方原生的Exchange做了功能的升级:
- 将DelayExchange接受的消息暂存在内存中
- 在DelayExchange中计时,超时后投递到队列中
延迟交换机插件只负责延迟,消息路由依然是官方提供的三种模式。
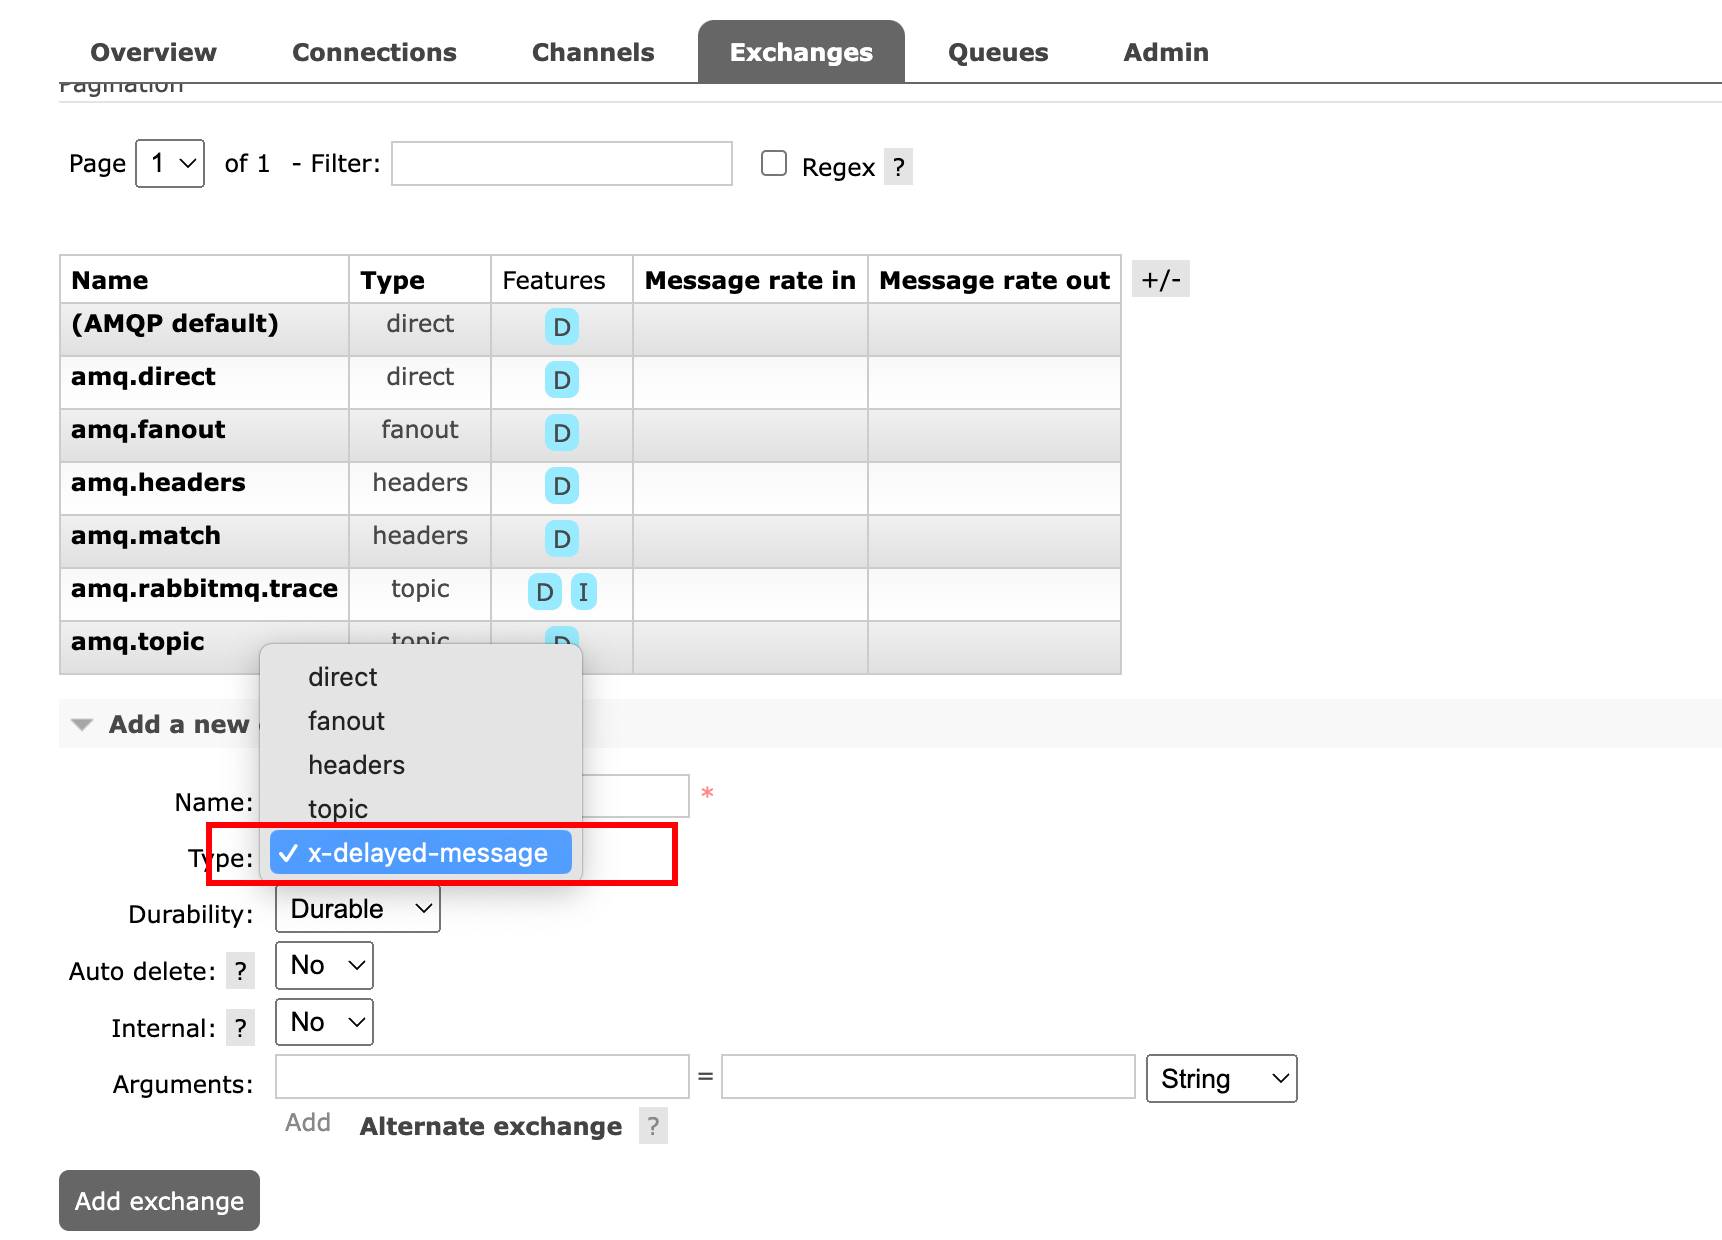
我们需要添加延迟交换机插件时,指定路由方式,指定x-delay-type,可选类型有fanout,direct,topic。
创建队列
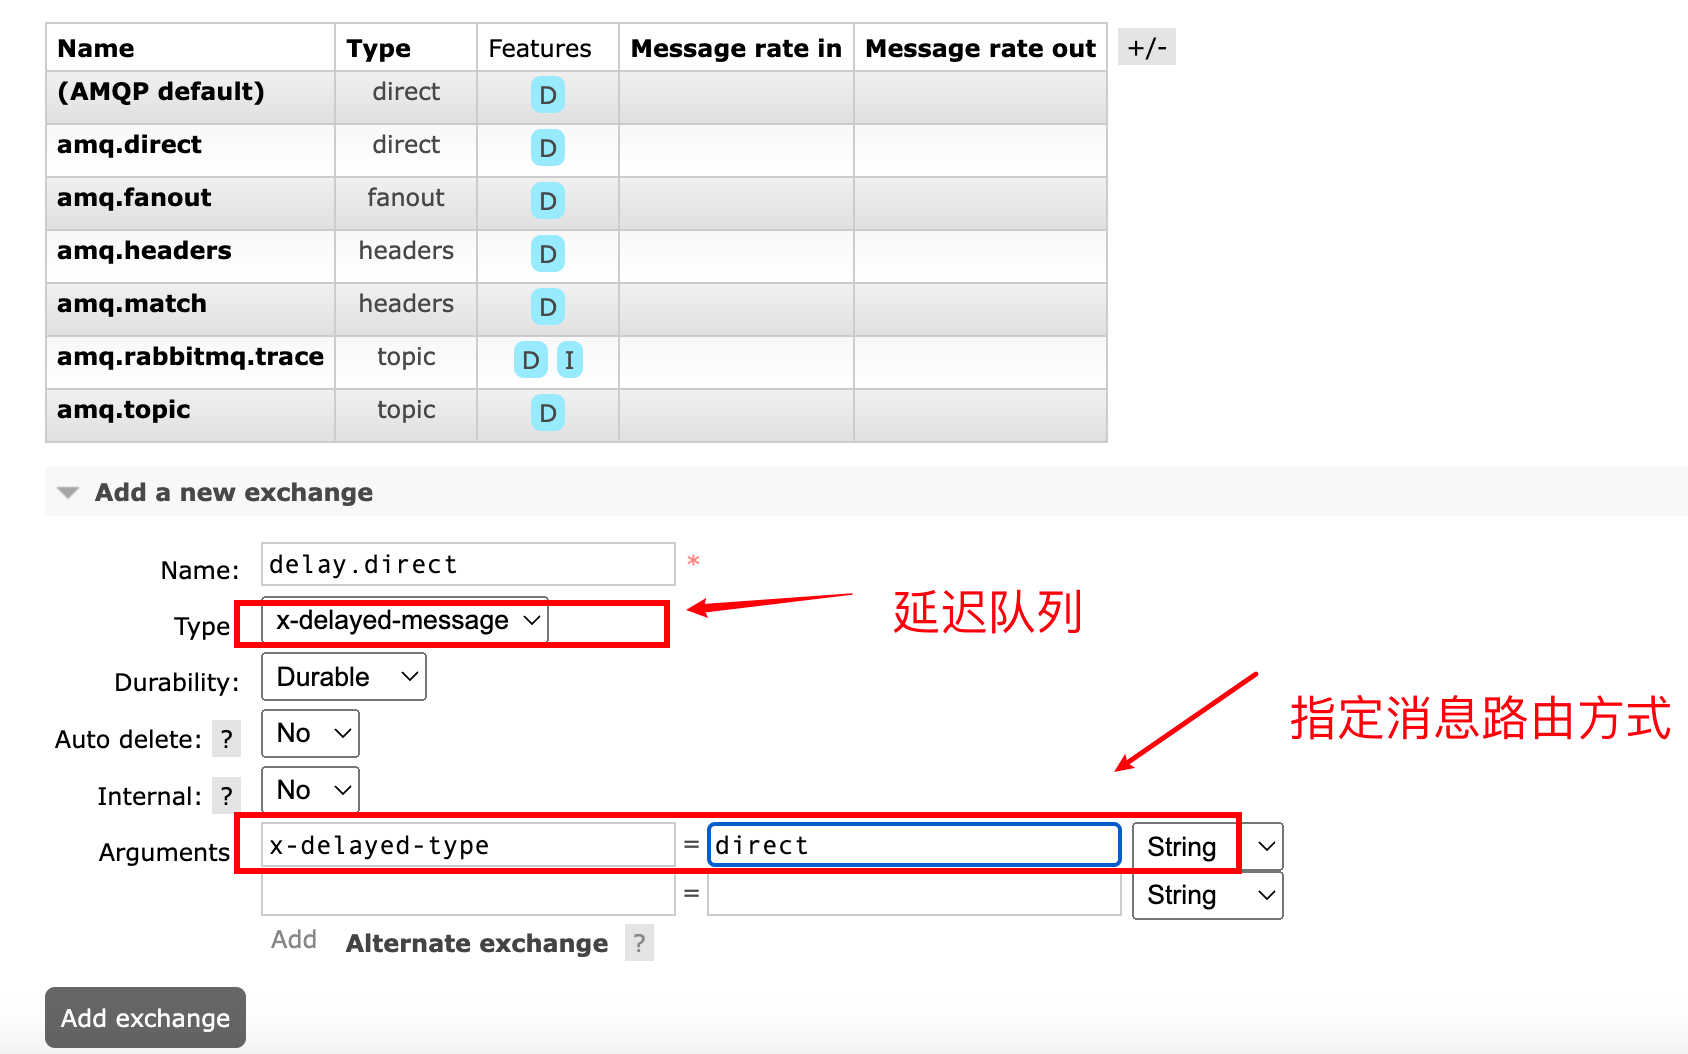
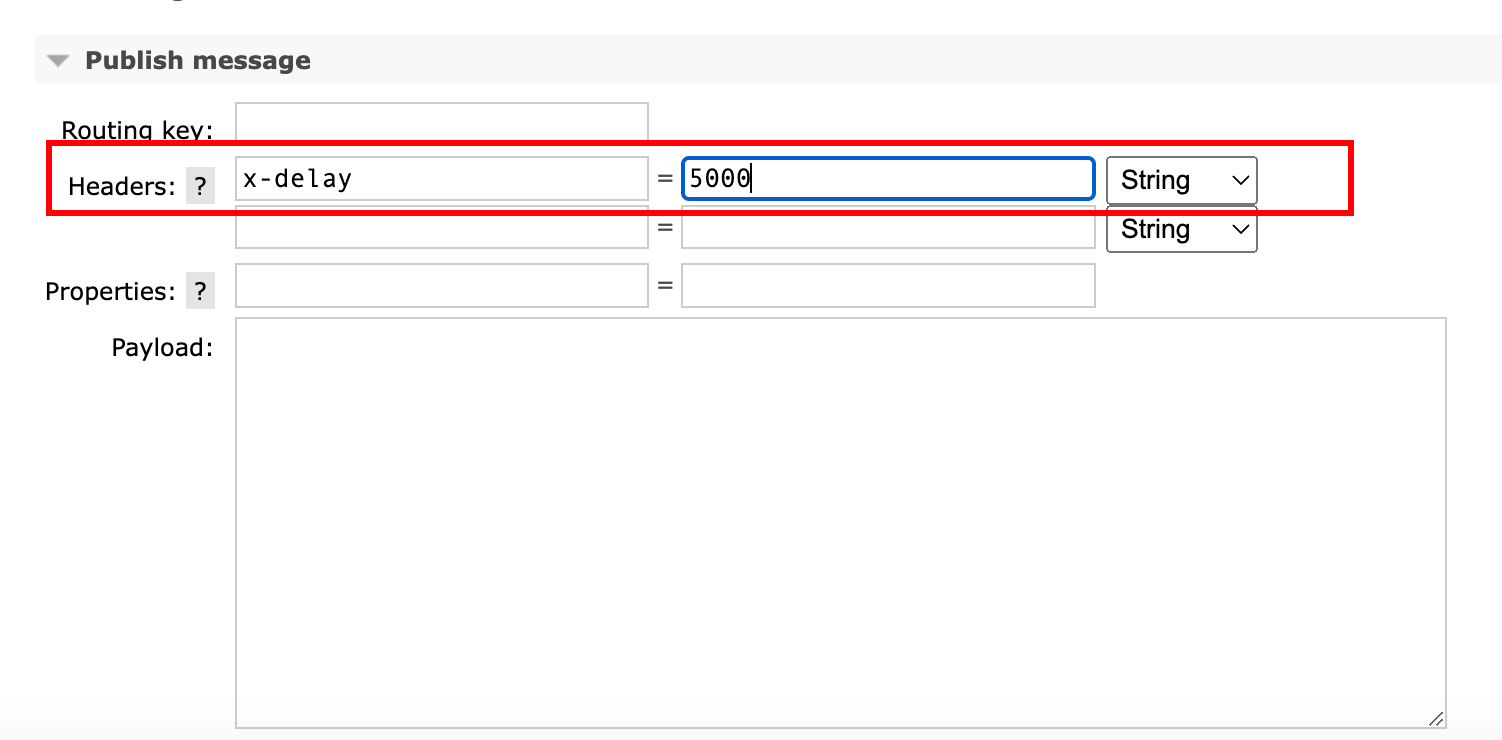
发送消息
消息的延迟时间要在发送消息时指定
SpringAMQP使用延迟队列插件
DelayExchange的本质是官方的三种交换机,只是添加了延迟功能。因此使用时只需要声明一个交换机。交换机的类型可以是任意类型,只要设定delayed属性为true即可。
使用注解声明
1
2
3
4
5
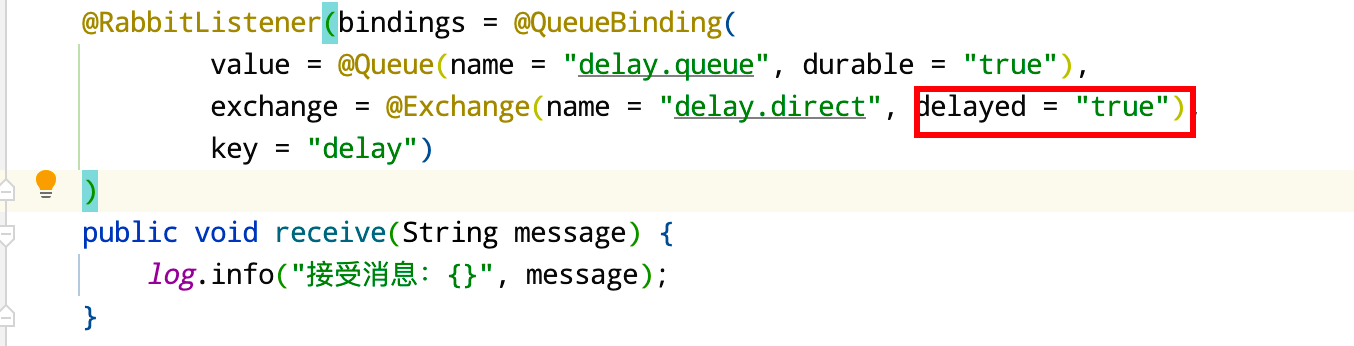
| @RabbitListener(bindings = @QueueBinding(
value = @Queue(name = "delay.queue", durable = "true"),
exchange = @Exchange(name = "delay.direct", durable = "true"),
key = "delay")
)
|
使用bean声明
1
2
3
4
5
6
7
8
9
10
11
12
13
14
15
16
17
18
19
20
21
22
23
24
25
26
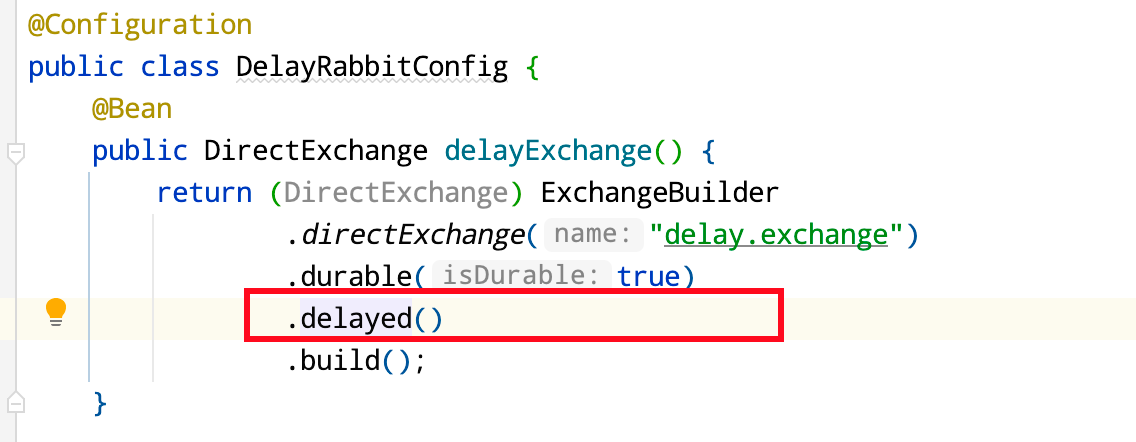
| @Configuration
public class DelayRabbitConfig {
@Bean
public DirectExchange delayExchange() {
return (DirectExchange) ExchangeBuilder
.directExchange("delay.exchange")
.durable(true)
.delayed()
.build();
}
@Bean
public Queue delayQueue() {
return QueueBuilder
.durable("delay.queue")
.build();
}
@Bean
public Binding delayBinding(DirectExchange delayExchange, Queue delayQueue) {
return BindingBuilder
.bind(delayQueue)
.to(delayExchange)
.with("delay");
}
}
|
发送消息
1
2
3
4
5
6
7
8
9
10
11
12
13
14
15
16
17
18
| @Slf4j
@Component
public class DelaySender {
@Resource
private AmqpTemplate amqpTemplate;
public void send(){
amqpTemplate.convertAndSend(
"delay.exchange",
"delay",
"hello world",
message -> {
message.getMessageProperties().setHeader("x-delay", 5000);
return message;
});
log.info("发送消息:{}", "hello world");
}
}
|
总结
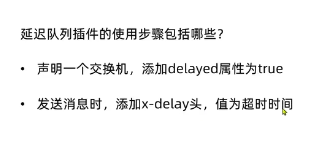
延迟队列插件使用步骤
- 声明一个交换机,添加delayed属性为true
- 发送消息时,添加x-delay头,值为超时时间
惰性队列
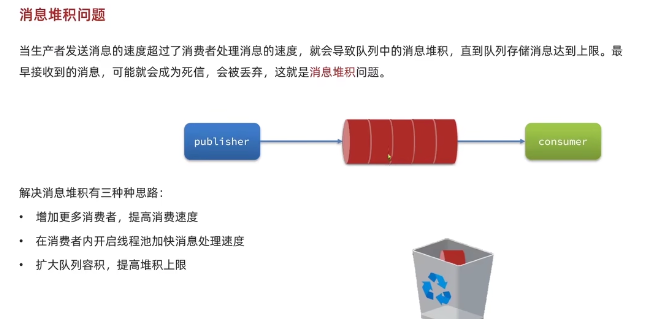
消息堆积
当生产者发送消息的速度超过了消费者处理消息的速度,就会导致队列中的消息堆积,直到队列存储消息达到上限,较早进入队列的消息,可能会成为死信会被丢弃,导致消息堆积问题。
队列过长的话会占用系统较多内存,如果超过预定设置的占比,RabbitMQ为了释放内存,会将队列消息转储到硬盘中,这个过程称之为page out,page out操作会消耗较长的时间,page out的过程中队列不能被处理消息。
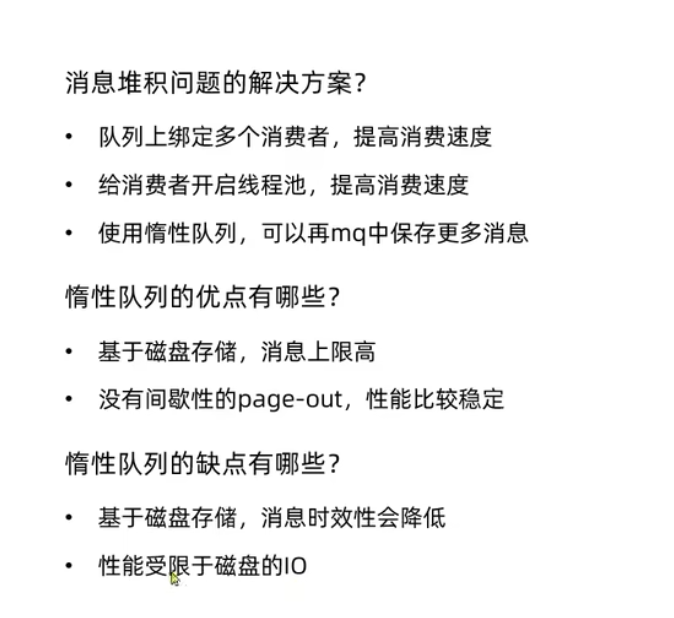
解决消息堆积的三种思路
- 增加更多消费者,提高消费速度
- 消费者内开启线程池加快消息处理速度
- 扩大队列容积,提供堆积上限
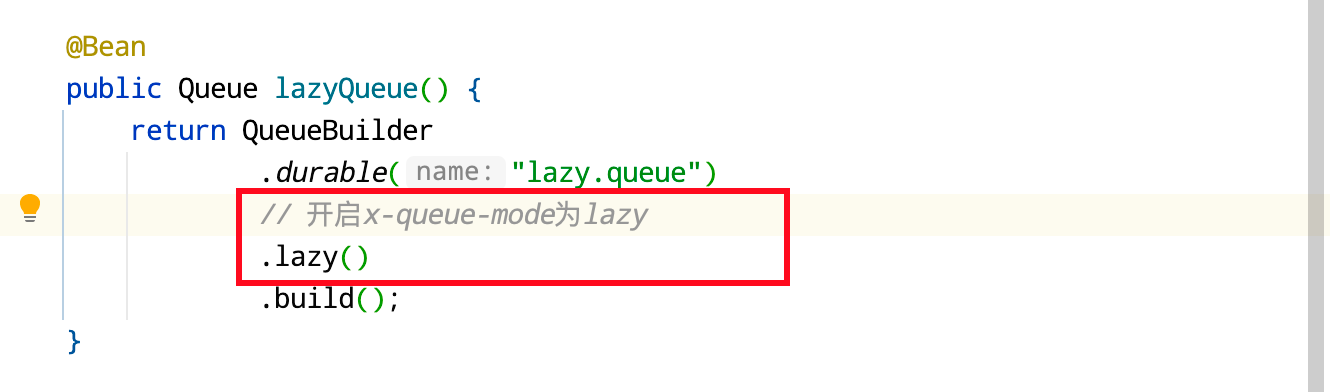
惰性队列
从RabbitMQ的3.6.0版本开始,RabbitMQ增加了Lazy Queues的概念,也就是惰性队列。
惰性队列的特征
- 接收到消息后直接存入磁盘而非内存
- 消费者消费消息要从磁盘中读取并加载到内存
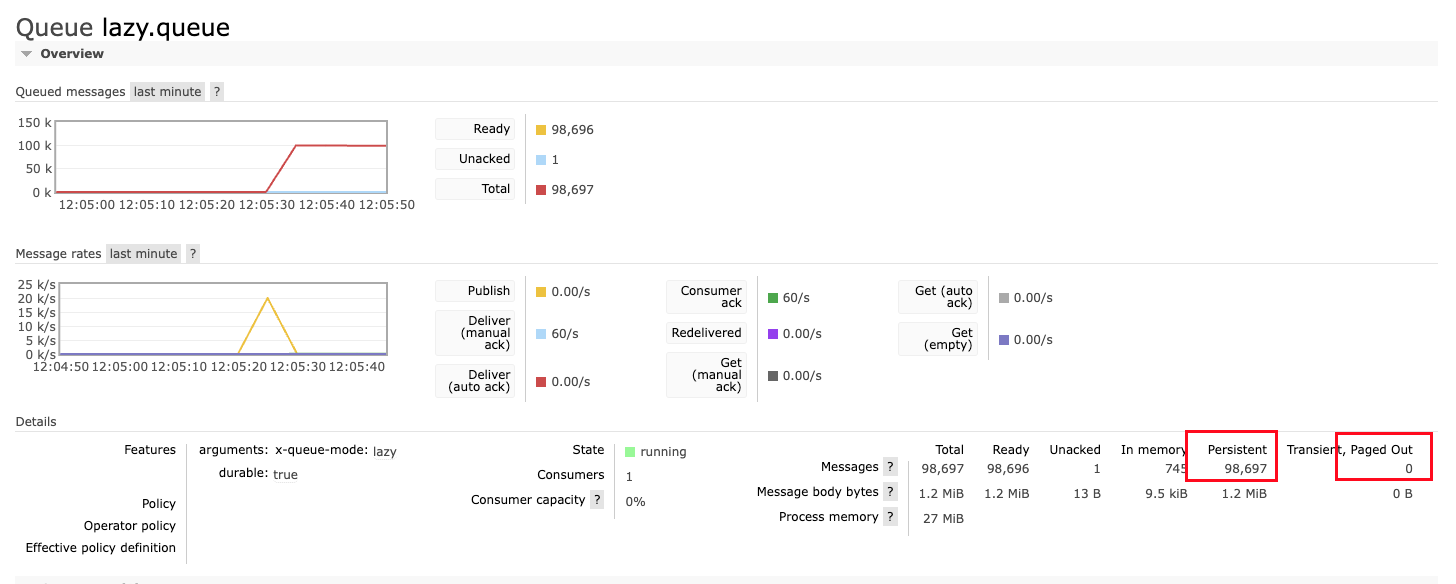
- 支持数百万条的消息存储


使用SpringAMQP声明惰性队列
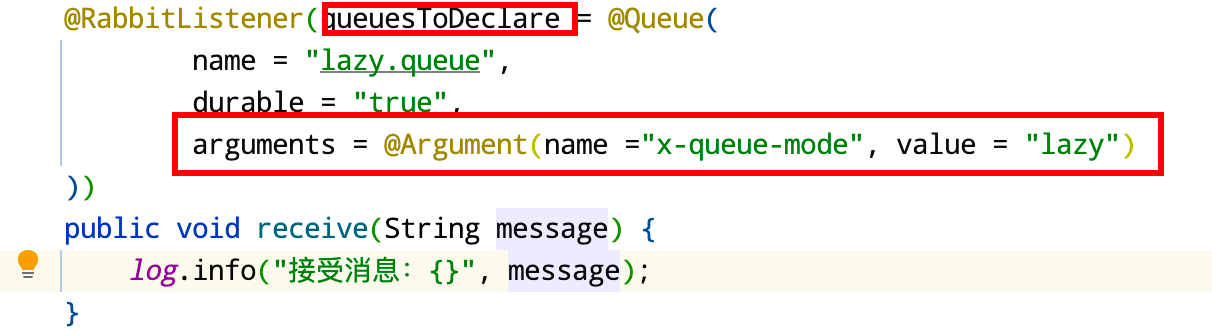
发送消息
1
2
3
4
5
6
7
8
9
10
11
12
| @Slf4j
@Component
public class LazySender {
@Resource
private AmqpTemplate amqpTemplate;
public void send() {
for (int i = 0; i < 100000; i++) {
amqpTemplate.convertAndSend("lazy.exchange", "lazy", "hello world");
}
}
}
|
总结
惰性队列的优点
- 基于磁盘存储,消息上限高
- 没有间歇性的page out,性能比较稳定
惰性队列的缺点
- 基于磁盘存储,消息处理存在时延,消息时效性会降低
- 性能受限于磁盘IO
MQ集群
集群分类
RabbitMQ是基于Erlang语言编写的,而Erlang是面向并发的语言,天然支持集群模式。
RabbitMQ的集群有两种模式:
- 普通集群:一种分布式集群,将队列分散到集群的各个节点,提高整个集群的并发能力
- 镜像集群:一种主从集群,普通部署的基础上,添加了主从备份功能,提高集群的数据可用性
镜像集群虽然支持主从,但是主从同步并不是强一致的,某些情况下可能有数据丢失的风险。因此在RabbitMQ在3.8版本以后,推出了新的功能:仲裁队列来代替镜像集群,底层采用Raft协议确保主从的数据一致性。
普通集群
普通集群即标准集群(classic cluster)
特征
- 在集群的各个节点间恭共享部分数据,包括交换机、队列元信息(队列的名字、队列的所在节点等),但不包括队列中的消息
- 访问集群某个节点时,如果队列不在该节点,会从数据所在节点传递到当前节点并返回(引用传递),当队列所在节点宕机时,队列中的消息将会丢失
集群各个节点共享的队列元信息的作用是:引用传递-消费者访问集群某一个节点时,如果要访问的队列不在该节点,由于集群节点共享队列元信息,该节点会帮消费者将消息从队列所在节点传递到当前节点并返回

部署
我们部署三个节点的RabbitMQ普通模式集群(集群中节点标识默认是:rabbit@[hostname])
RabbitMQ依赖Erlang,Erlang语言是面向并发和分布式的语言,默认支持集群模式,底层做节点通讯时需要授权和身份认证,使用cookie认证来判断是否被允许相互通信。只有每个集群节点必须具有相同的cookie时,实例之间才可以相互的通信(cookie是一串最多255个字符的字母数字字符)。
读取cookie信息
1
| docker exec -it rabbitmq cat /var/lib/rabbitmq/.erlang.cookie
|

创建配置文件
1
2
3
4
5
6
7
8
9
10
11
12
13
14
15
16
17
| # 创建文件夹
mkdir -p /mydata/rabbitmq-cluster
# 创建配置文件
touch rabbitmq.conf
# 配置
loopback_users.guest = false
listeners.tcp.default = 5672
cluster_formation.peer_discovery_backend = rabbit_peer_discovery_classic_config
cluster_formation.classic_config.nodes.1 =rabbit@mq1
cluster_formation.classic_config.nodes.2 = rabbit@mq2
cluster_formation.classic_config.nodes.3 = rabbit@mq3
# 创建cookie文件
touch .erlang.cookie
# 写入cookie
echo "XSPZIJEFHCNREHSPFXUX" > .erlang.cookie
# 修改权限
chmod 600 .erlang.cookie
|
拷贝文件
1
2
3
4
5
6
7
| mkdir rabbitmq1 rabbitmq2 rabbitmq3
cp rabbitmq.conf rabbitmq1
cp rabbitmq.conf rabbitmq2
cp rabbitmq.conf rabbitmq3
cp .erlang.cookie rabbitmq1
cp .erlang.cookie rabbitmq2
cp .erlang.cookie rabbitmq3
|
创建网络
1
| docker network create rabbitmq-net
|
创建容器
1
2
3
4
5
6
7
8
9
10
11
12
13
14
15
16
17
| docker run -p 5673:5672 -p 15673:15672 --name rabbitmq1 --net rabbitmq-net \
-v /mydata/rabbitmq-cluster/rabbitmq1/rabbitmq.conf:/etc/rabbitmg/rabbitmg.conf \
-v /mydata/rabbitmq-cluster/rabbitmq1/.erlang.cookie:/var/lib/rabbitmq/.erlang.cookie \
-v /mydata/rabbitmq/plugins:/plugins \
-d rabbitmq:3.9-management
docker run -p 5674:5672 -p 15674:15672 --name rabbitmq2 --net rabbitmq-net \
-v /mydata/rabbitmq-cluster/rabbitmq2/rabbitmq.conf:/etc/rabbitmg/rabbitmg.conf \
-v /mydata/rabbitmq-cluster/rabbitmq2/.erlang.cookie:/var/lib/rabbitmq/.erlang.cookie \
-v /mydata/rabbitmq/plugins:/plugins \
-d rabbitmq:3.9-management
docker run -p 5675:5672 -p 15675:15672 --name rabbitmq3 --net rabbitmq-net \
-v /mydata/rabbitmq-cluster/rabbitmq3/rabbitmq.conf:/etc/rabbitmg/rabbitmg.conf \
-v /mydata/rabbitmq-cluster/rabbitmq3/.erlang.cookie:/var/lib/rabbitmq/.erlang.cookie \
-v /mydata/rabbitmq/plugins:/plugins \
-d rabbitmq:3.9-management
|

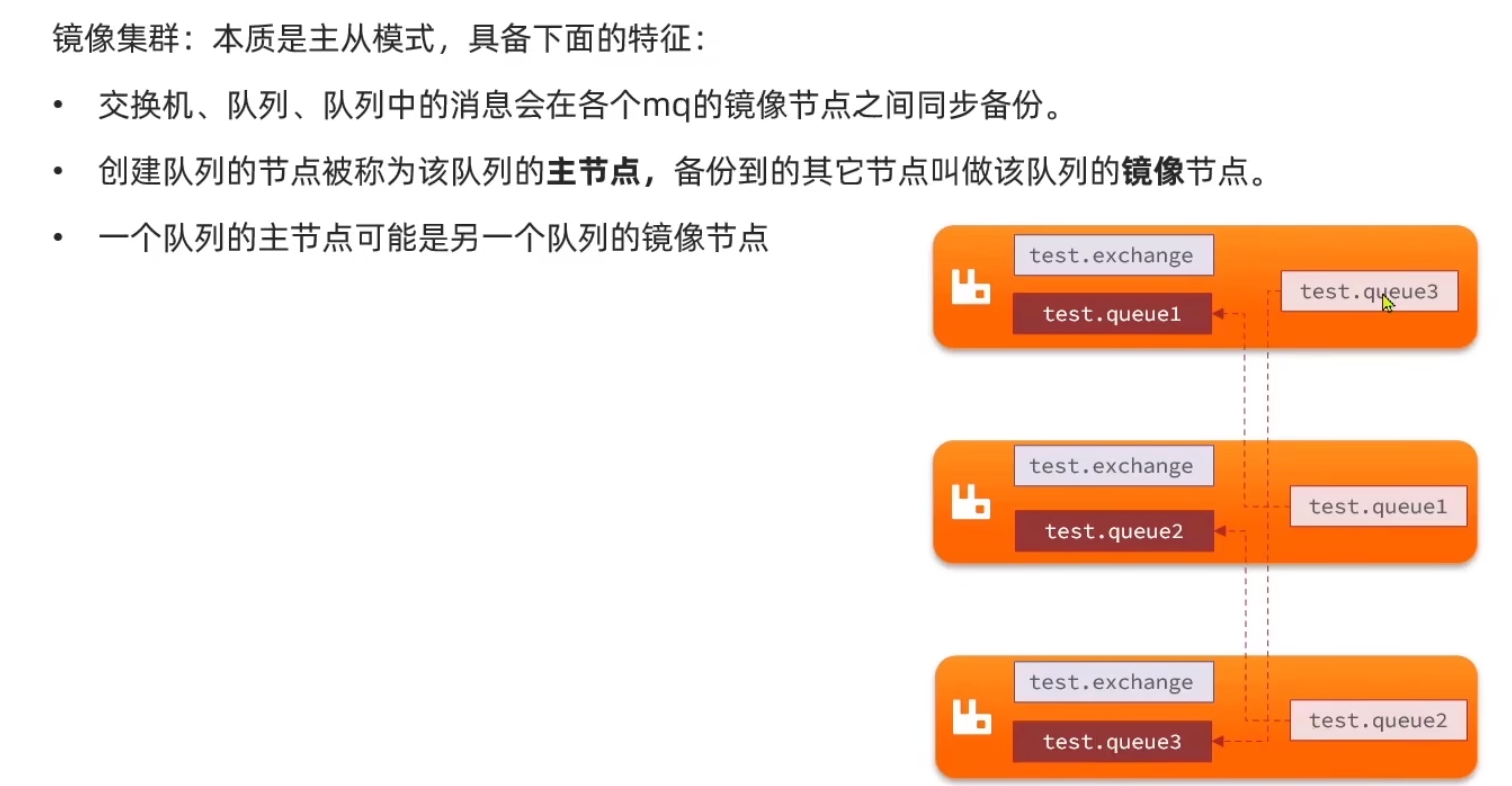
镜像集群
普通集群一旦创建队列的主机宕机,队列就不可用,不具备高可用的能力。
镜像集群(本质是主从模式)
镜像模式的配置
镜像模式的配置有三种模式:
exactly模式
1
| rabbitmqctl set_policy ha-two "^two\." '{"ha-mode":"exactly", "ha-params":2,"ha-sync-mode":"automatic"}'
|
- rabbitmqctl:RabbitMQ客户端命令行
- set_policy:设置策略
- “^two.“:匹配队列的正则表达式,符合命名规则的队列才会生效
- 策略内容:
- “ha-mode”:”exactly”:策略模式
- “ha-params”:2:策略参数
- “ha-sync-mode”:”automatic”:同步策略
all模式
1
| rabbitmqctl set_policy ha-all "^all\." '{"ha-mode":"all"}'
|
nodes模式
1
| rabbitmqctl set_policy ha-nodes "^nodes\." '{"ha-mode":"nodes","ha-params":["rabbit@nodeA", "rabbit@nodeB"]}'
|
仲裁集群
镜像集群虽然支持主从,但是主从同步并不是强一致的,某些情况下可能有数据丢失的风险。因此在RabbitMQ在3.8版本以后,推出了新的功能:仲裁队列来代替镜像集群,底层采用Raft协议确保主从的数据一致性
- 与镜像队列一样,都是主从模式,支持主从数据同步
- 使用简单,没有复杂的配置
- 主从同步基于Raft协议,保证强一致性
使用
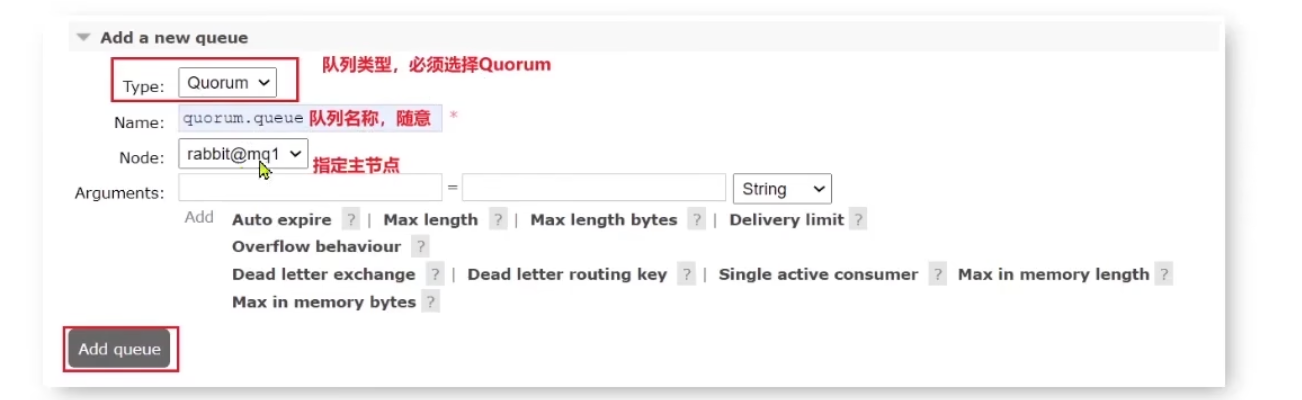
控制台添加
在控制台添加一个队列,选择队列类型为Quorum类型
整合SpringAmqp
SpringAmqp添加
1
2
3
4
5
6
7
| @Bean
public Queue quorumQueue() {
return QueueBuilder
.durable("quorum.queue")
.quorum()
.build();
}
|
SpringAmqp配置
1
2
3
4
5
6
| spring:
rabbitmq:
addresses: xxx.xxx.xxx.xxx:xxx xxx.xxx.xxx.xxx:xxx xxx.xxx.xxx.xxx:xxx // 集群节点地址集合
username: xxxxxx
password: xxxxxx
virtual-host: /
|